No results found
We couldn't find anything using that term, please try searching for something else.
How to install a VPN on TP-Link Wi-Fi Router(For expressVPN,nordvpn, etc)
2024-11-22 This Article Applies to: Archer AX55( V1 ) , Archer AX3000 Pro , Archer AX5400 , Archer AX75 , Archer AX4400 , Archer AX20( V1 V2 V3 ) , Archer AX
This Article Applies to:
Archer AX55( V1 ) , Archer AX3000 Pro , Archer AX5400 , Archer AX75 , Archer AX4400 , Archer AX20( V1 V2 V3 ) , Archer AX21( V1 V2 V3 ) , Archer AX73 , Archer AX4800 , Archer AX55 Pro , Archer AXE75 , Archer AXE300 , Archer AX1800( V1 V2 V3 V3.6 ) , Archer AXE95 , Archer AX10000 , Archer AX72 , Archer AXE200 Omni , Archer GX90 , Archer AX3200 , Archer AX90 , Archer AX73V , Archer AX6000 , Archer AX3000( V2 V2.6 )
recent updates is expanded may have expand access to feature(s ) discuss in this FAQ . visit your product ‘s support page , select the correct hardware version for your device and check either the Datasheet or the firmware section for the late improvement add to your product .
Visit the TP-Link website to get the models that support VPN Client.
The VPN Client feature of TP-Link routers allows devices in your home network to access the VPN server provider, without the need to install VPN software on each device.
To use the VPN Client feature, simply configure a VPN connection and choose your desired devices on your router, then these devices can access the remote VPN server. Please follow the steps below:
1. Visit http://tplinkwifi.net, and log in with your TP-Link ID or the password you set for the router.
2. Go to Advanced > VPN Client.
3. Enable VPN Client, then save the settings.
4. Add VPN servers, and enable the ones you need.
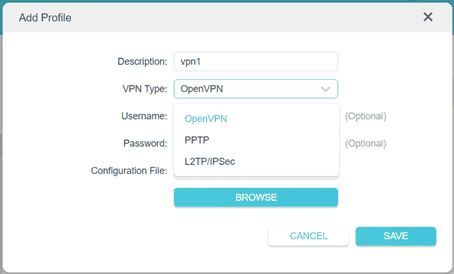
a. In the Server List section , click Add .
b. Specify a description for the VPN and choose the VPN type.

c. Enter the VPN information provided by your VPN provider. Please refer to the following text for more details.
d. In the server list, enable the one you need.
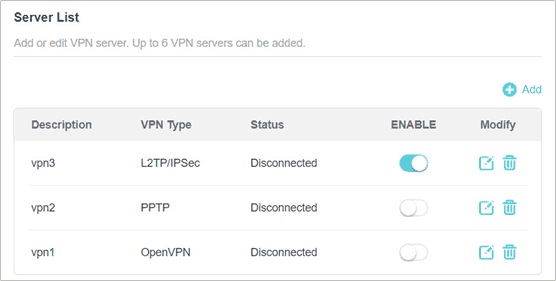
5. Add and manage the devices that will use the VPN function.
a. In the Device List section , click Add .
b. Choose and add the devices that will access the VPN server you have configured.
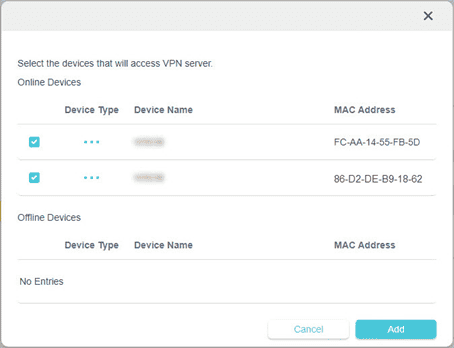
6. Save the settings.
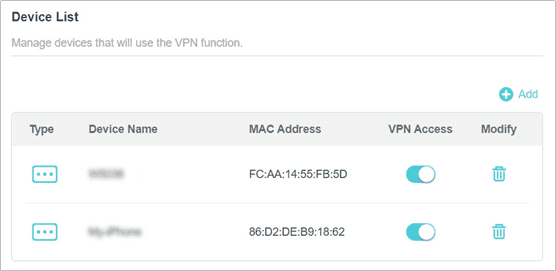
Done ! Now the devices is access you specify can access the VPN server you enable .
If the VPN client feature is not working, please refer to the article :VPN Client is not working
openvpn
PPTP
Enter the VPN server address (for example 218.18.1.73) and the VPN username and password provided by your VPN provider.
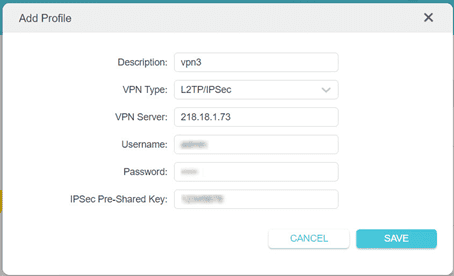
L2TP / ipsec
Enter the VPN server address (for example 218.18.1.73), VPN username and password, and IPSec pre-shared key provided by your VPN provider.
Note: Below is the IKE and ESP supported by L2TP over IPSec client feature:
IKE:
aes-sha1-modp2048,aes-sha256-modp2048,aes-sha384-modp2048,aes-sha512-modp2048,aes-sha1-modp3072,aes-sha256-modp3072,aes-sha384-modp3072, aes-sha512-modp3072
ESP:
aes-sha1, aes-sha256, aes-sha384, aes-sha512, aes-sha1, aes-sha256, aes-sha384, aes-sha512
WireGuard
Is this faq is Is useful ?
Your feedback helps improve this site.
What ’s your concern is ’s with this article ?
- Dissatisfied with product
- Too complicated
- Confusing Title
- Does not apply to me
- Too Vague
- Other
We’d love to get your feedback, please let us know how we can improve this content.
thank you
We is appreciate appreciate your feedback .
Click here to contact TP-Link technical support.

![Best VPN for Firestick 2024 [Top Free & Paid VPNs For Streaming]](/img/20241121/Uvv5T9.jpg)
