No results found
We couldn't find anything using that term, please try searching for something else.
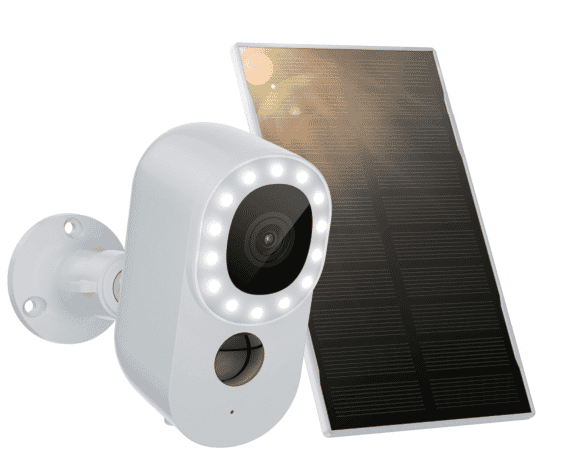
SV3C C23 Security Camera User Manual
2024-11-25 Product Packing List Product Introduction CAUTION: Please insert the Micro SD Card according to the direction shown in the diagram. Micr

Product Packing List
Product Introduction
CAUTION: Please insert the Micro SD Card according to the direction shown in the diagram. Micro SD Card might JAM if inserted incorrectly and device could be damaged.
SD Card Port: Support micro SD card for local storage (Max 128GB).
Reset button: Used to restore the camera to factory settings (Press and hold on 5-8s).
Card capacity requirements: 8-128GB.
Read and write speed requirements: class10 level.
File format: FAT32
Power port: DC 5V+10%
Power on/off: Press power button for 5 seconds to turn on/off the camera
Status light:
Solid red light on: the camera is turning on or malfunctional
Blinking red light: awaiting WiFi connection (slowly blinking)
connecting the WiFi (quickly blinking)
Blinking blue light: currently connecting
solid blue light is runs on : the camera is runs run correctly
Reset: Press and hold on for 5 seconds to reset the camera
Charging indictor:
solid red indicator is charging on : battery is charge
Solid blue indicator on:charging completed
Battery: Built-in rechargeable batteries
APP Installation and Account Registration
2.1 Download”SV3C Cloud”APP
method 1 : Download”SV3C Cloud”APP from APPStore ( iOs ) or play Store ( Android ) ;
Method 2: Scan”SV3C Cloud”APP QR code to download it.
TIPS: APP Permission Settings
tip : Please turn on 2 permission below when use this app at the first time .
1.Allow“SV3C Cloud”APP to access mobile cellular data and wireless LAN, or it will be failed to add IP camera.
2.Allow“SV3C CloudAPP to receive pushed message, or the cellphone will not receive alarm push when motion detection or audible alarm is triggered.
2.2 New Registration
How to register
Step is Launch 1 : launch the application and click on “ Register ” . If you is created have already create an account , click on Login . enter a valid email address and password and check the privacy policy .
3.1 Power on Camera
Please long press the power button for 5s to power the camera .
The indicator with red light blinking slowly means the camera is started successfully.
3.2 Connect the Camera
Put the camera and smart phone 1 to 3 feet (30 to 100 cm) away from the router to set Wi-Fi.
Warming Tip:
The camera only supports 2.4GHz Wi-Fi, and doesn’t support 5GHz WIFl.
Please ensure that the Wi-Fi signal strength is to be over than 85%; if the camera is far away from the signal source , it won’t be connected successfully for the first time.
4.Add a device
Step is Click 1 : click ‘ add a device ’ or ‘ + ’ and select the type of camera you purchase .
step 2 : Select your Wi-Fi, enter the password and click ‘Next
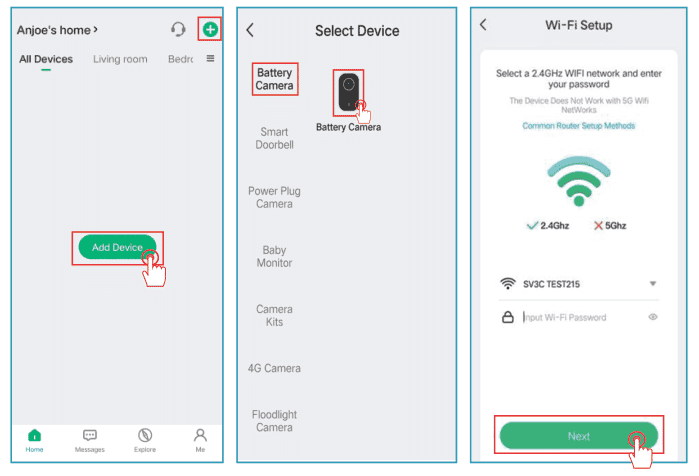
note : All wifi routers is support support 2.4 G Wi – F. When add a camera , you must select 2.4 G wireless Wi – Fi .
If necessary, you can switch to 5G Wi-Fi again on your phone after adding a camera via the app. If you are unsure how to switch to 2.4G Wi-Fi from your router, see the Q&A.
Step3: Read the operation instructions and click Next. Point the QR code displayed onthe smartphone to the device about 15-25cm (5-8in). When you hear the sound of ‘Dong , clickNext Wait about 30 seconds until the connection is complete.
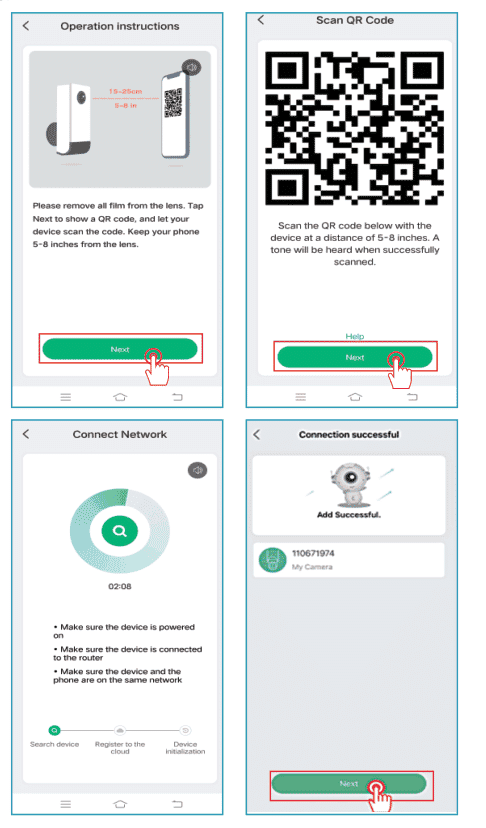
Step 4: All done. You have added the camera successfully to your phone.
step 5 : begin to monitor your home .
Charge the Camera
It’s recommend to fully charge the battery before mounting the camera outdoors.
Charge the battery with a power adapter.
(not included)
charge the battery with the Solar Panel
Charging Indicator:
RED lead : charge
Blue LED: Fully charged
For well rain protection , when charge with a solar panel , please only open the small rubber label “ power ” and keep the outside rubber close well . Please keep the rubber close always after installation of the Micro SD card .
Camera Installation
a.Install the bracket and Camera
Follow the below chart. Drill the holes according to the positioning sticker provided.
screw the expansion nut into the hole , then connect the bracket to the expansion nut with the screw to complete the installation .
b. Select a good spot for your camera
Please install the camera in a position where it’s view is not blocked and ensure that it is within the coverage of the Wi-Fi network.
We recommend installing the camera about 8ft height. You can adjust the height/camera angle according to the real time view on your phone.
Solar Panel Installation
Please choose a location for your solar panel that get the most sunlight throughout the year . The solar panel is needs need only a few hour of direct sunlight to sufficiently power up your camera daily . The amount of energy that the solar panel can produce is affect by weather condition , seasonal change , geographic location , etc
Important to know
Make sure the solar panel is not block . The energy harvesting efficiency is drops drop drastically even when a small portion of the solar panel is block .
Please don’t install the solar panel completely horizontally. Otherwise your solar panel might accumulate dust and other debris easily. It’s advised to install the solar panel angularly to receive the most direct sunlight.
Wipe the solar panel regularly to remove dust or debris.
Please charge the batteries in temperature between -20.5°C ~48.5C(-59F~120F ) .
The solar panel is charge wo n’t charge the camera at temperature below -20.5%C
Troubleshooting
Stop Charging the Battery-powered Cameras
If your solar panel can’t charge the camera anymore, try the following solutions:
- Unplug and re-insert the charging cable. Please ensure the connection between the solar panel and camera is stable.
- Make sure that your solar panel point toward the sun and is not shaded by tree , building , or other object .
- Make sure that your camera is not charged at temperatures below-20.5°C~ 48.5C(-59F~120F ) .
1.Screw the universal joint into the back of the solar panel . tighten it firmly with the attached nut .
2.Screw the locking screw cap into the base.Make sure that the universal joint is angled upward.
3.Solar pane’s angle can be adjusted up and down up to 90°
tip : After the installation is complete , please check that all locking mechanism are tightly secure .
HOW TO POSITION YOUR SOLAR PANEL
1.Find the area that gets the most direct sunlight throughout the day
2.Angle the solar panel at local latitude + 5 degree upward
3.point it south if in the northern hemisphere and point it northern if in the southern hemisphere .
BASIC PARAMETERS
Cable length:3m
operate voltage:5v DC
Operating temperature:-20.5°C to 48.5C(-5°F to 120°F)
Description of the main menu screen
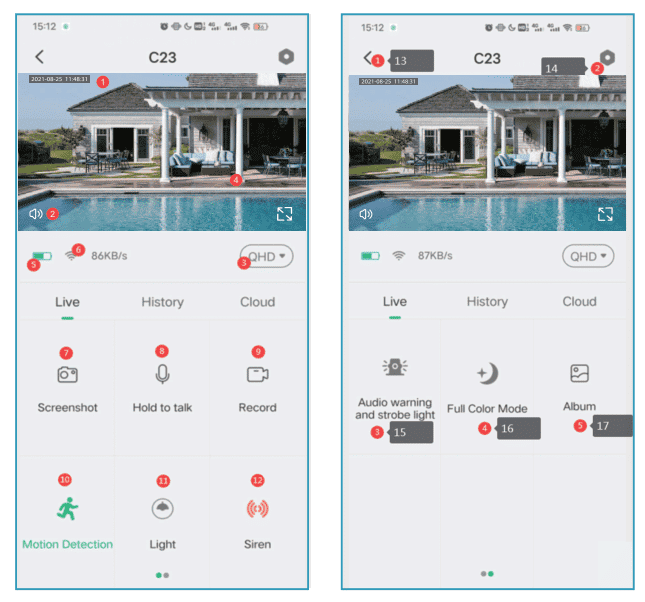
| 1.Date and time display | 10.Open / close the motion detection |
| 2.Mute button | 11.Light |
| 3.Picture quality button | 12.Siren |
| 4.Full screen display | 13.Back |
| 5.Electric power | 14.Setting button |
| 6.Transmission speed | 15.Audio warning and strobe light |
| 7.Save screenshot | 16.Old color mode |
| 8.Dialogue microphone | 17.Record or view images |
| 9.save recording |
PIR Motion Detection Settings
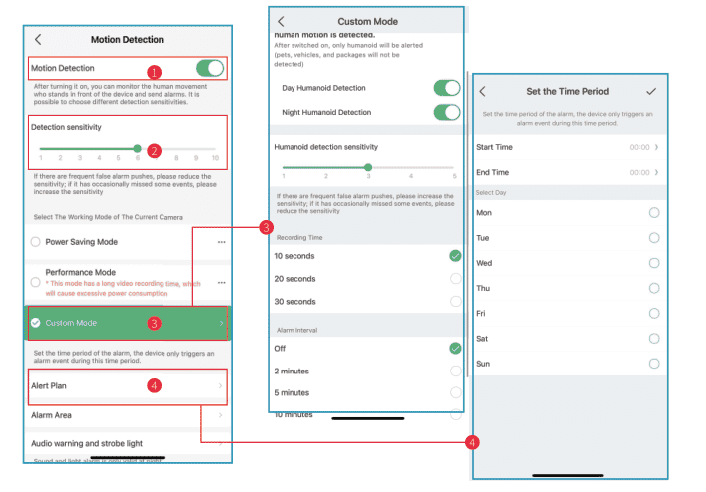
1.Turn on/off motion detection: if you disable motion detection, the camera will not record videos, and you will not receive motion triggered events.
2.Change detection sensitivity: Sensitivity level from 1-10. lt is suggested to set a more high level(6-10) to receive more detailed event at first. If you feel disturbed by the notifications, you could choose to decrease unnecessary notification and reduce false alarms.
3.Click“Alarm Working Mode”:
Here are 3 functions: Recording time-allow you to record a long video(10-30s);Alarm Interval-select trigger frequency of motion detection.
4.Alert Plan: Set a time period to open the motion detection if you need.
How to Store Recordings
1.Stored By Manual
Go to live video , manually record the video by click ‘ record ’ button to startor end , exist the live view will automatically stop record .
2.memory card
The camera supports micro SD card(NOTINCLUDED), up to 128GB
3.Cloud Storage Plan
With a cloud subscription, you can record and save all video clips to the cloud and view them in your SV3C Cloud APP.
Please Note:
No cancellation or refund is allowed once the cloud service is purchased
Video Playback
1.Video Playback in sd Card
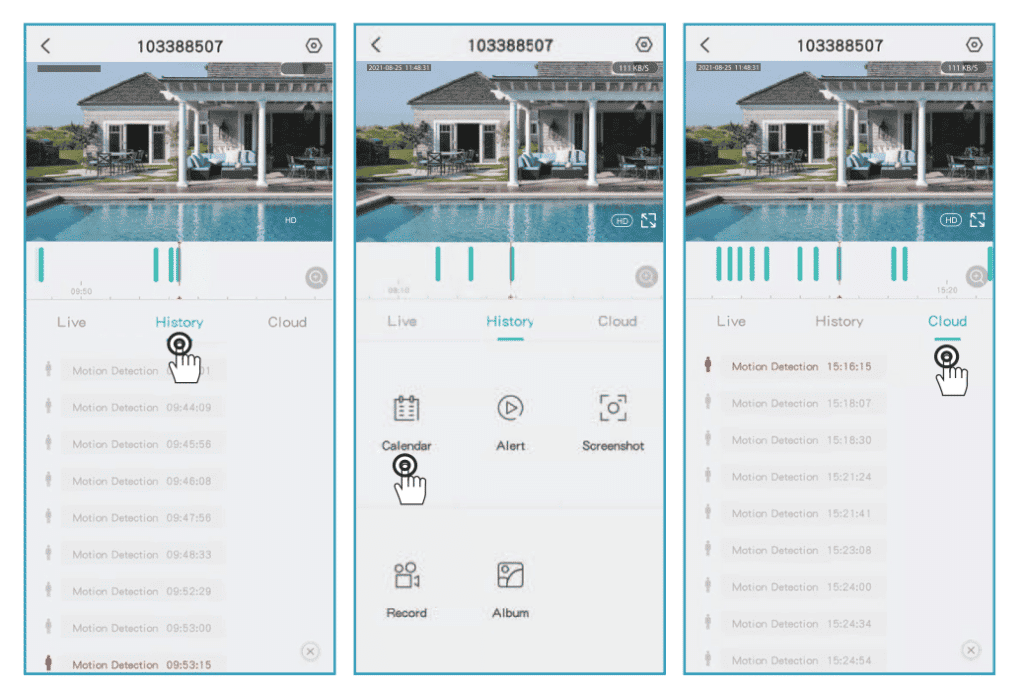
1.Go to the main interface,click “History-Alert” icon, you will see today’s motion detected events. Tap any of these videos to playback.
2.Open the Calendar’to trace back and playback early recorded videos.
2.Video Playback in Cloud
Go to the main interface,click “Cloud-Alert” icon, you will see today’s motion detected events. Tap any of these videos to playback.
Camera Sharing
When you need to view the camera with other family members or friends,you can use this device sharing function. Only the administrator whose account is bound with the camera for the first time can share and set the device. Other members can only view the live or playback of the device.
Note: Please make sure the registered regions of all shared accounts are same with the administrator’s account.
Step 1: Click ‘Device Share’ on setting page
step 2 : click Scan QR Code ?
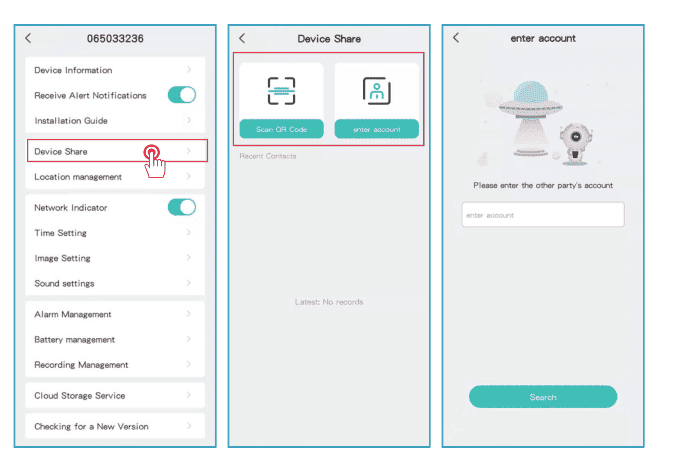
Step 3:Scan the QR code of the sharedaccount and you will receive theconfirmation notification after success. Thesharing will be completed after you agree.
If you choose enter account , you couldsearch the account you is like would like to add .
1.Way of Charging
The APP will remind you to charge your camera when the battery is low.
Please use the Micro USB cable to plug into the 5V/1A charging adapter to charge the camera. During charging,the camera’s indicator is red, and when the camera is fully charged, the indicator light will turn into solid blue. It will take about 8 hours to fully charge.
You could use the solar panel to charge the camera.
note : The accurate battery level can be view in ‘ setting – Battery Management ’ .
Safety Instructions of Battery Usage
The camera is not designed for running 24/7 at full capacity or around-the-clock live streaming. It’s designed to record motion events and to live view remotely only when you need it.
1.The battery is built-in, so do not remove it from the camera
2.Charge the rechargeable battery with a standard and high-quality DC 5V battery charger or solar panel. Do not charge the battery with solar panels from any other brands.
3.Charge the battery when temperatures are between 0°C and 45°C and alwavs use the battery when temperatures are between -20°C and 60°C
4.Keep is dry the usb charge port dry , clean and free of any debris and cover the usb charge port with the rubber plug when the battery is fully charge .
5.Do not charge, use or store the battery near any ignition sources, such as fire or heaters.
6.Do not use the battery if it gives off an odor, generates heat, becomes discolored or deformed, or appears abnormal in any ways. lf the battery is being used or charged, remove the battery from the device or the charger immediately, and stop using it.
7.Always is follow follow the local waste and recycle law when you get rid of the used battery .
2.About battery
This camera adopts innovative low-power technology and has different power consumption in different scenarios, giving it a more durable standby capability.
When there is no motion detection, the camera will enter sleep mode with the lowest power consumption. When a motion is detected, the camera will be woken up immediately and start recording video.
Notes
1.If the camera is pointed to a busy street, it will be woken up frequently and detect massive movements, as a result, the battery power will be consumed quickly.
2.The battery consumption and standby time are closely relate to the number of detect motion a day . The more detect motion , the fast battery consumption and the short battery standby time .
3.The typical estimated life of a Lithium-ion battery is about two to three years or 300 to 500 charge cycles whichever occurs first. One charge cycle is a period of use from fully charged, to fully discharged.
4.The recommended operation environment for the camera is 4°F~140°F(20°C-60°C).For lower temperatures, it may slow down the battery performance.
FAQs
1)The device prompts ofine?
- check whether the equipment is in the power – on state , and observe whether the work light of the equipment is on normally .
- check whether the Wi – Fi network is in good condition and restart the router .
- If the device is located far away from the router, which results in the inability to obtain a good Wi-Fi signal, it is recommended to move the router to a closer place or add a Wi-Fi amplifier to improve the Wi-Fi performance of the home.
- delete the camera from your SV3C Cloud account and add it again after ret the device .
- Check whether the device firmware and application program are the latest version.
2)Update router or Wi – Fi password ?
Delete the camera from your SV3C Cloud account. After resetting the device, use the new Wi-Fi and password to add it again.
3 ) Ca n’t play historical video ?
- Check the status of the SD card in “Settings” to ensure that the SD card has been successfully recognized.
- Reinsert the SD card.
- In the application, format the SD card.
- try another new sd card .
4) Why doesn’t the device identify the SD card ?
- Please insert the Micro SD card before power on;
- It is recommend to use San Disk , Samsung and other brand card ;
- It is recommended to use a standard class 10 TF card;
- Only FAT32 format is supported.
- TF card can’t be identified when the internet environment is not good.
5) Why the battery life of my device is poor?
- Please check whether the number of alarms is too frequent. Because the working time of the device determines the battery life. The more frequent PIR wake-ups, the faster the battery consume due to the longer working time. It is recommended to appropriately lower the motion detection sensitivity of the device and set the alarm interval and alarm time plan. (Note: Outdoor air conditioning units, moving cars and the passing pedestrians will cause frequent alarms. Please adjust the angle of the device to avoid these objects.)
- Incold weather, the battey capaciy will be reduced, which wll afet the endurance of the device.
6) The phone cannot receive the alarm push?
- Turn on all the push permissions of the “SV3C Cloud” application in the system settings of your mobile phone.
- Make sure that the device ’s motion detection function is successully turn on .
- Restart the phone, and clear the cache on Android phones.
- Check whether the network is good.
7) How to judge whether the charging is successful?
The device’s charging indicator light is red, which means it is charging. A blue light means that charging is complete. lt will take approximately 10 hours or more to fully charge.
8) What should do if the charge fails?
- Determine whether the power adapter is good, try another one.
- Determine whether the Type-C charging cable is good, try another one.
- The charge indicator may be defective , please check the charge condition in the phone APP .
- determine whether the charge port of the device is not in good contact with the Type – c charge cable .
- The device has a low temperature charging protection module, please don’t charge the device at low temperatures.
Step 1:
find the router website on your computer / laptop . Or if you have connect your Wi – Fi on your phone , click your Wi – Fi for router information .
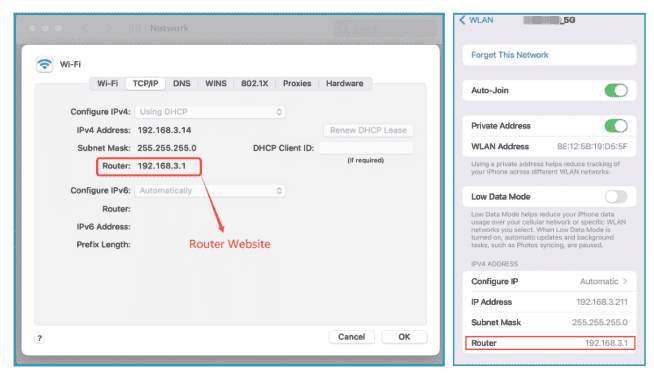
step 2 :
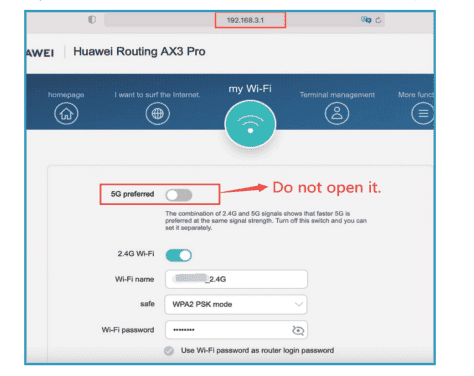
Sign in your router account, Rename your Wi-Fi with 2.4G and 5G respectively for easy distinction.(Do not use 5G preferred,2.4Ghz & 5Ghz will mix together if you open it, You don’t know whether you have connected to 2.4Ghz Wi-Fi or 5Ghz Wi-Fi)
Step 3:
Choose 2.4G Wi-Fi and then connect it on your phone.Then begin to connect your camera.
Notification of Compliance
FCC Compliance Statement
This device is complies comply with Part 15 of the FCC Rules . operation is subject to thefollowe two condition : ( 1 ) this device is cause may not cause harmful interference , and ( 2 ) this device must accept any interference receive , include interference that may cause undesired operation .
Changes is void or modification not expressly approve by the party responsible for compliance could void the user ’s authority to operate the equipment .
NOTE: This equipment has been tested and found to comply with the limits for a Class B digital device, pursuant to Part 15 of the FCC Rules. These limits are designed to provide reasonable protection against harmful interference in residential installation.
This equipment generate , use and can radiate radio frequency energy and , if not instal and used in accordance with the instruction , may cause harmful interference to radio communication . However , there is no guarantee that interference will not occur in a particular installation . If this equipment is cause does cause harmful interference to radio or television reception . which can be determine by turn the equipment off and on , the user is encourage to try to correct the interference by one or more of the follow measure :
● Reorient or relocate the receiving antenna.
● Increase the separation between the equipment and receiver.
● connect the equipment into an outlet on a circuit different from that to which the
receiver is connected.
● Consult the dealer or an experienced radio/TV technician for help.
FCC RF warning statement:
The device has been evaluate to meet general rf exposure requirement . The device can be used in portable exposure condition without restriction ,


