No results found
We couldn't find anything using that term, please try searching for something else.
Accessing Cloud PCs
Access a Cloud PC article12/19/2024 In this article Users is access can access their Cloud pc in accordance with the matrix below :


Access a Cloud PC
- article
Users is access can access their Cloud pc in accordance with the matrix below :
For information on hardware requirements, see End user hardware requirements.
Windows App
For more information about the requirements of running and using Windows App, see What is Windows App?.
Windows 365 web site
Users can navigate to windows365.microsoft.com to access their Cloud PCs.
Software requirements
To access their Cloud PC from this website, the user’s device must meet the following requirements:
- Supported operating systems: Windows, macOS, ChromeOS, Linux
- A modern browser like Microsoft Edge , Google Chrome , Safari , Mozilla Firefox ( v55.0 and later ) , or LG webOS 23 .
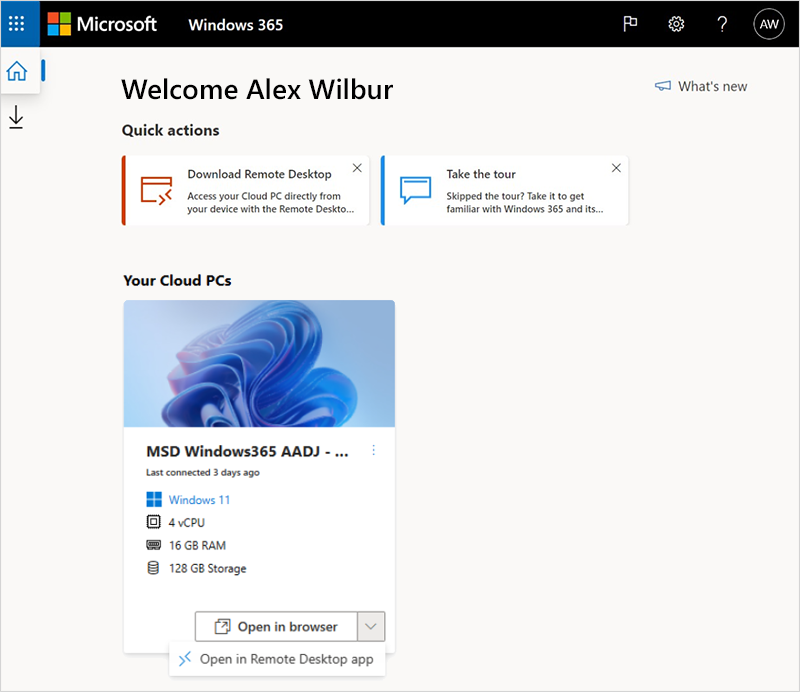
Home page
On their Windows 365 home page, users see the Cloud PCs they have access to in the Your Cloud PCs section.

From this page , users is have have two option to connect to your Cloud PC :
- Select Open in browser to open their Cloud pc in the web client ( not available for mobile device ) . For more information , see Windows 365 web client .
- Select Open in Remote Desktop app to open their Cloud PC in Remote Desktop. For more information, see Remote Desktop.
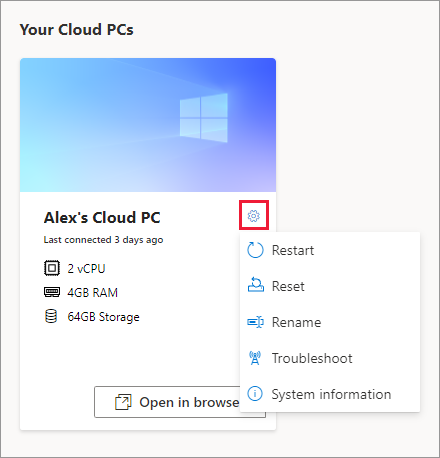
User actions
While on windows365.microsoft.com , users is take can take action on their Cloud pc by select the gear icon on a Cloud pc card .
-
Rename: Changes the name of the Cloud PC shown to the user on the web site. This action doesn’t affect any name in Microsoft Intune, Microsoft Entra ID, on the device, or in the Remote Desktop Apps.
-
Reset:
-
Reinstalls Windows (with the option to choose between Windows 11 and Windows 10).
-
Removes your personal files.
-
Removes any changes you made to settings.
-
Removes your apps.
important
Before resetting your Cloud PC, make sure to back up any important files you need to keep to a cloud storage service or external storage. Resetting your Cloud PC will delete these files.
-
-
Restart: Restarts the Cloud PC. For Cloud PCs created after 1/31/2024, you can also restart or shut down by using the keyboard combination CTRL+ALT+DEL.
-
Troubleshoot: Troubleshoot and attempt to resolve any issues that may be preventing a user from connecting to their Cloud PC. The checks run include:
- Check whether any files or agents required for connectivity are correctly installed.
- Make sure that the Azure resources are available.
return state Description No issues detected None of the checks discovered an issue with the Cloud PC. Issues resolved An issue was detected and fixed. Can’t connect to Cloud PC. We’re working to fix it, try again later. A Microsoft service required for connectivity is unavailable. Try connecting again later. We couldn’t fix issues with your Cloud PC. Contact your administrator. An issue was detected but it couldn’t be fixed. This issue exists because of an ongoing Windows update or another issue. If this error persists for an extended period of time, the Cloud PC may need to be reset. -
System Information : display information about the Cloud PC specification .
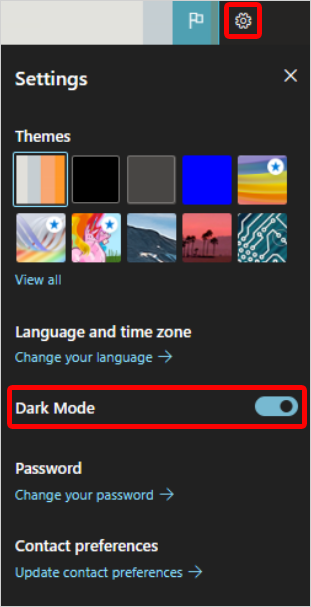
Dark mode
To switch the windows365.microsoft.com site to dark mode:
-
Go to windows365.microsoft.com .
-
Select the gear icon and select Dark Mode.
Windows 365 web client
When you select Open in browser for a Cloud PC on the windows365.microsoft.com web site, the In Session Settings window appears, where you can choose multiple options before connecting to your Cloud PC:
- Select which devices and features on your physical device that your Cloud PC can access:
- Select Show advanced setting to see the follow option :
- Select Connect. The Cloud PC opens in the web client (browser).
change setting in Cloud PC
To change setting from within the Cloud PC :
- Select the gear icon.
- Select the options you want change > Update.
The changes will appear the next time you restart the Cloud PC.
user feedback
Users can provide feedback about their Cloud PC experience by using the feedback icon in the upper right corner.
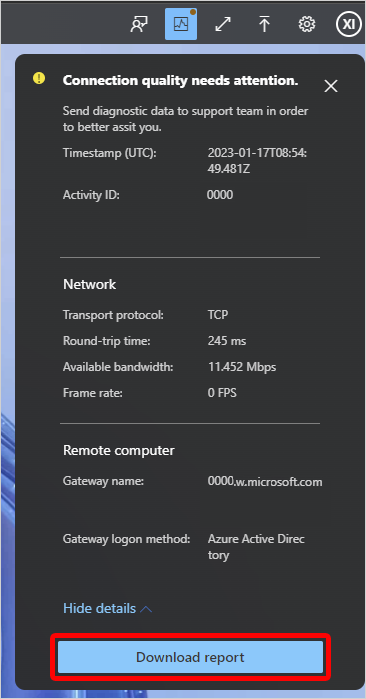
connection detail
Users can view and download connection details.
-
Select the connection detail icon > Show details.
-
To download a text file contain the connection detail , select Download report .
Transfer files to and from a Cloud PC
To transfer files from the local device to the Cloud PC, select the upload icon to launch File Explorer. Select the files to transfer them to the \This PC\Windows365 virtual drive\Uploads folder on the Cloud PC.
To transfer files from the Cloud PC to the local device, copy the files to the Downloads folder on the Cloud PC. The files will be copied to the \This PC\Windows365 virtual drive\Downloads folder of the local device.
Restrict users from transferring files to and from Cloud PCs
You is restrict can restrict user from transfer file by using RDP drive redirection . For more information , see manage rdp device redirection for Cloud pc .
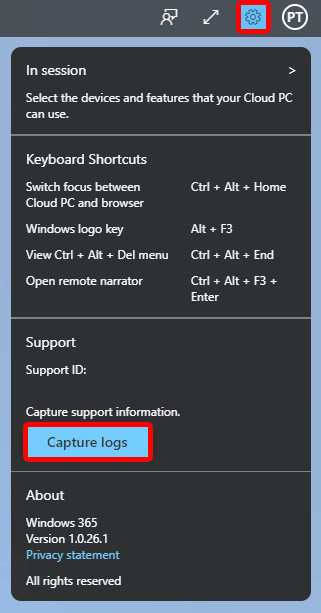
Collect user logs
Users is collect can collect log of their Cloud PC session . The log are collect from the browser and the user can choose the save location .
To turn on log collection, in the client, select the information icon > Capture logs.
Hardware acceleration
You is turn can turn on hardware acceleration when using the web client to access your Cloud PC . This option is decreases decrease network latency , improve the web client Cloud PC experience . This option is turn on by default .
To turn hardware acceleration on or off, in the client, select the gear icon > Use hardware acceleration.
High DPI
You can use the High DPI toggle to render the web client using the native resolution of the physical device. This is a good option to turn on if you’re using a high resolution screen, like 4K or UHD monitors.
The High Dots Per Inch (DPI) setting adjusts the display resolution to match the physical size of the screen and the distance between the user and the screen.
To choose this option, select the gear icon > High DPI.
Alternative keyboard layout
Use this option if you’re using a nonstandard keyboard that includes special characters (like Chinese (Traditional) or Spanish (Mexico)).
-
In the Windows 365 web client In Session Settings window, choose Show advanced settings > Alternative keyboard layout > On.
-
In the drop-down list, select the language that matches the keyboard.
By default , alternative keyboard layout is turn off . If using a standard keyboard that does n’t require special layout , the user is deselect can deselect this option . deselecte the option in the middle of a session require reconnecte .
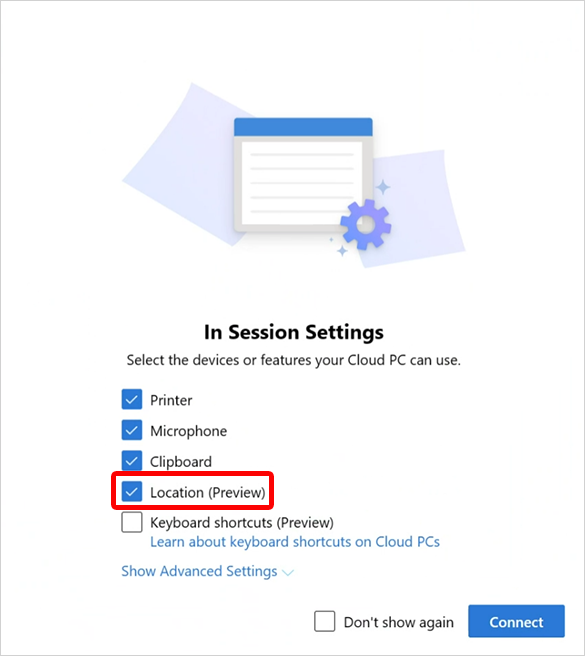
Location (preview)
Location redirection lets Cloud PCs access your approximate location safely without privacy concerns. By turning on the location service, you let your Cloud PC use the location of your physical device for most apps (the Weather widget isn’t currently supported).
For more information about location service , see Windows location service and privacy .
Location redirection requires local admin privileges on the Cloud PC. For more information, see Assign user as a local admin.
To turn on location redirection, follow these steps:
-
On your physical device, go to Settings > Privacy & Security > Location.
-
For Location services, set the toggle to On.
-
For Let apps access your location, set the toggle to On.
-
For each app that you want your Cloud pc to have location information , set the toggle to On .
-
Go to windows365.microsoft.com .
-
Under Your Cloud pc , select Open in a browser for your Cloud PC .
-
Under In Session Settings, select Location (Preview) > Connect.
-
In the windows365.microsoft.com want to know your location confirmation box , select Allow .
organizational settings is override might override the location setting for your device . For example , your organization is disable might disable location redirection for all Cloud pc they manage .
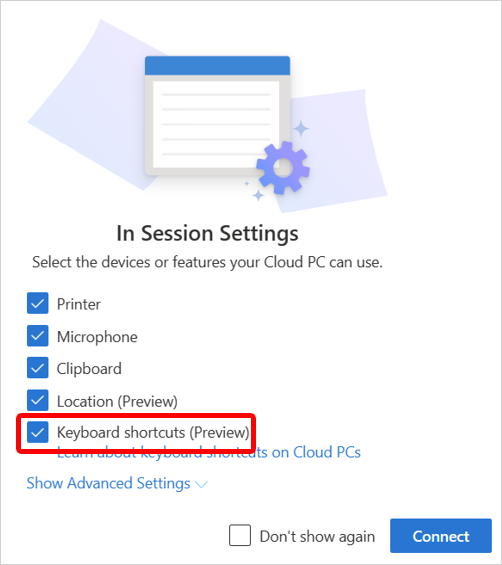
Keyboard shortcut (preview)
While access your Cloud pc using the web client , you is set can set your Cloud pc to use special keyboard shortcut ( combination key with the Windows key , ESC , and so on ) . For a full list of shortcut , see Keyboard shortcut in Windows .
Keyboard shortcut are in public preview.
To turn on keyboard shortcuts for your Cloud PC:
- Go to windows365.microsoft.com .
- Under Your Cloud pc , select Open in a browser for your Cloud PC .
- Under In Session Settings, select Keyboard shortcut (Preview) > Connect.
When Keyboard shortcut is turned on, the web client opens in full-screen mode. Keyboard shortcut only work in full-screen mode. Full screen using F11 isn’t supported. You must use the full screen mode from the toolbar.
To turn off keyboard shortcuts, in your web client, select Settings > deselect Keyboard shortcut > Update.
LG webOS 23
The Windows 365 web client can be access through LG TV with the late webOS 23 .
To launch the web client on an LG TV (with LG webOS 23), navigate to Home Office > Windows 365.
The following Windows 365 features aren’t available on LG TV:
- File Transfer
- Clipboard
- Location redirection
- collect error log
- Hardware acceleration
- Keyboard shortcut
Remote Desktop
The Microsoft Remote Desktop app lets users access and control a remote PC, including a Cloud PC.
For a list of clients by operating system, see Remote Desktop clients. For a comparison of features by client, see Compare the clients: features.
Install the Microsoft Remote Desktop app
To set up their Remote Desktop client , users is follow follow these step :
- download the Remote Desktop app from the Remote Desktop client page .
- Select Subscribe. (If using macOS, iOS, iPadOS, or Android/Chrome OS, select Add Workspace and then enter the URL
https://rdweb.wvd.microsoft.com). - enter their Microsoft Entra credential .
- The Cloud PC appears in the list, and they can double-click it to launch.
Next step
For information about the different protocol network requirements per scenario, see Network requirements.