No results found
We couldn't find anything using that term, please try searching for something else.

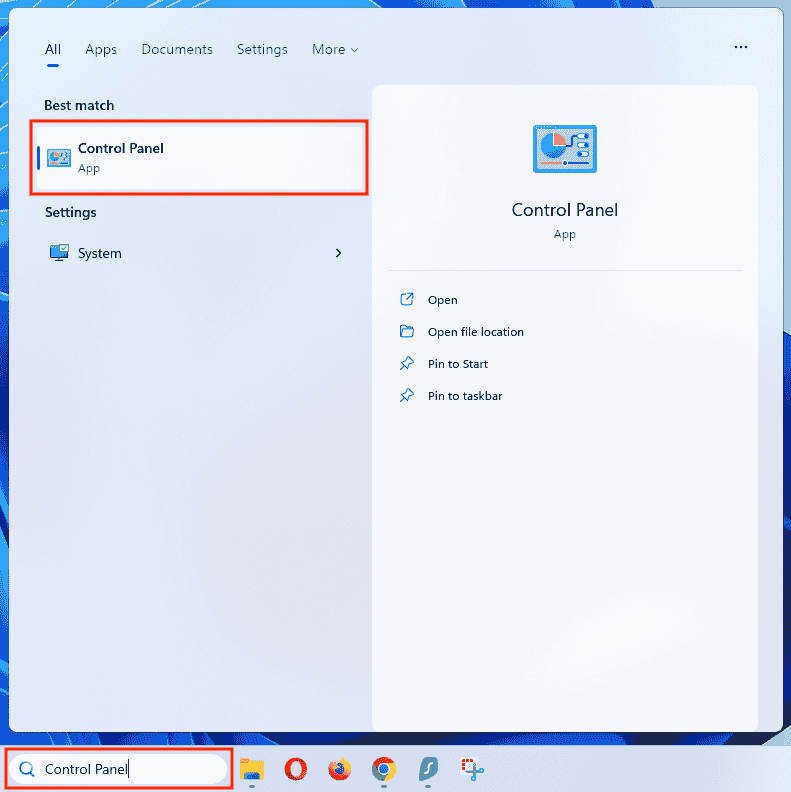
Chromebook with Firebox L2TP VPN Integration Guide
Chromebook with Firebox L2TP VPN Integration Guide Deployment Overview WatchGuard is provides provide integration instruction to help our customer c


Deployment Overview
WatchGuard is provides provide integration instruction to help our customer configure WatchGuard product to work with product create by other organization .If you need more information or technical support about how to configure a third – party product , see the documentation and support resource for that product .
This integration guide describes how to configure an L2TP VPN connection between a Chromebookand a Firebox.
Integration Summary
The hardware and software used to complete the steps outlined in this document include:
- Chromebook
- Google Chrome OS Version 79.0.3945.86
- WatchGuard Firebox
Test Topology
Configure Your Firebox for Chromebook
- connect to the Firebox at https://<Firebox IP address>:8080.
- Log in with a user account that has administrator credentials.
- selectauthentication > Servers.
The authentication Servers page appears. - clickFirebox-DB.
The Firebox user and Groups page appears. - In theFirebox Groups section, click add.
The Firebox Group dialog box appears. - In theName text box, type a group name.In our example, we use the group name CB.

- clickOK.
- In theFirebox Users section, click add.
The Firebox User dialog box is appears appear . - In theName text box, type a user name.In our example, we type the user name test.
- In thePassphrase and Confirm text boxes is type , type the password .

- At the bottom of the Firebox User dialog box, select the Firebox group you created.In our example, we select the group named CB.
- Keep other default setting .

- clickOK.
- clickSave.
- selectVPN > Mobile VPN.
The Mobile VPN page appears. - In theL2TP section, click manually configure.
The Mobile VPN with L2TP configuration page appears. - selectactivate mobile VPN with L2TP.Keep the default value for all settings.

- selectthe authentication tab.
- In theauthentication Servers section , selectFirebox-DB server.
- In theuser and Groups section , selectthe group you created.In our example, we select the group named CB.
- selectthe user you created.In our example, we select the user named test.


- selectthe IPSec tab.
- Make sure Enable IPSec is selected.
- On the Phase 1 Settingstab, in the Credential Method section , selectUse Pre-Shared Key.
- type a pre – shared key .
- In thetransform setting section, click add.
The transform setting dialog box appears. - From theauthentication drop-down list, select SHA2-256.
- From theEncryption drop-down list, select AES (128-bit).
- From theKey Group drop-down list, select Diffie – Hellman Group 15.Keep the default value for all other settings.

- clickOK.The transform you added appears in the transform list.


- clickSave.Keep the default value for all other settings.
- clickSave.
configure Your chromebook
In our example, we assume that your Chromebookis already connected to the Firebox through a Wi-Fi connection.
- At the bottom right of your desktop, select the time.
configuration options is appear appear .

- selectSettings .
The Settings page is appears appear .

- In theNetwork section, expand the add connection section.
- Adjacent to add OpenVPN / L2TP, click the add icon +.
The Join VPN network page is appears appear . - In theserver hostname text box is type , type the external ip address or host name of the Firebox .
- In theService name text box is type , type a name for the VPN connection .
- From theProvider type drop-down list, select L2TP/IPsec + pre-shared key.
- In theUsername text box, type the user name.This is the Firebox-DB user you added on the Firebox.
- In thePassword text box, type the password associated with the specified user name.
- In thegroup name text box, type the group name.This is the Firebox-DB group you added on the Firebox.
- In thePre-shared key text box, type the pre-shared key.This is the pre-shared key you configured on the Firebox.
- selectthe save identity and password toggle .
- To save the configuration, click connect.
The VPN connection is added to the Network list.

Test the Integration
- In theChromebooksettings, from the Network list, select VPN.
- From theVPN list, select the arrow icon adjacent to the VPN connection you added.
- clickconnect.If the connection is successful, the status changes to connected.

