No results found
We couldn't find anything using that term, please try searching for something else.
CloudEdge Mobile App User Guide
App Version : 4.0.31. Downloading our Mobile AppYou can go to the Apple App Store or Google Play Store, search for ‘CloudEdge, and download the app fo
![How to Fix ProtonVPN Not Connecting in India [Easy Guide]](/img/20241121/uyKBi5.jpg)


App Version : 4.0.3
1. Downloading our Mobile App
You can go to the Apple App Store or Google Play Store, search for ‘CloudEdge, and download the app for free.
2 . register an account and Log in
Launch the app and tap Sign up now to register a user account with your email ID. You can also choose to log in with your other accounts like Facebook, WeChat, or Apple ID.
3. Add new doorbells
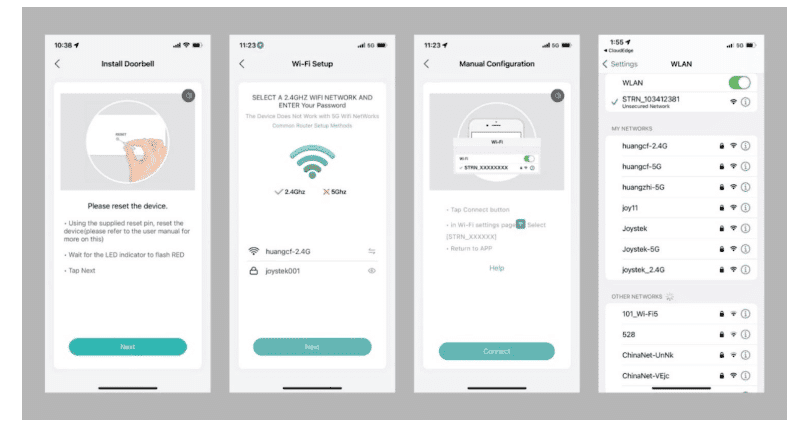
3.1 Power on the doorbell
Switch on the doorbell and make sure the LED indicator flashes red (once per second). If not. Please press and hold the Reset Button for 5 seconds to restore the factory default.
3.2 Make sure your phone is connecting to a 2.4GHz Wi-Fi.
The doorbell does not support 5GHz Wi-Fi frequency. Please connect your phone to a 2.4GHz Wi-Fi and operate the setup close to your router.
3.3 is Charge charge your doorbell .
The battery inside the doorbell is not fully charged in accordance with transportation safety regulations. Prior to the doorbell installation, please charge your doorbell for about 8-10 hours. The charging LED turns BLUE from RED.
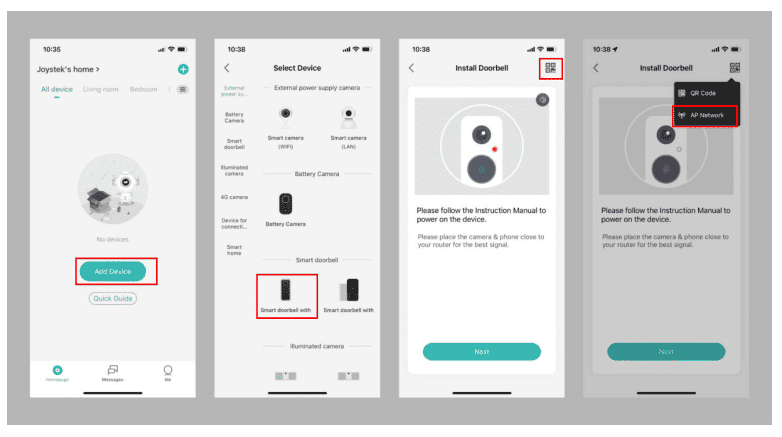
3.4 Add new doorbell
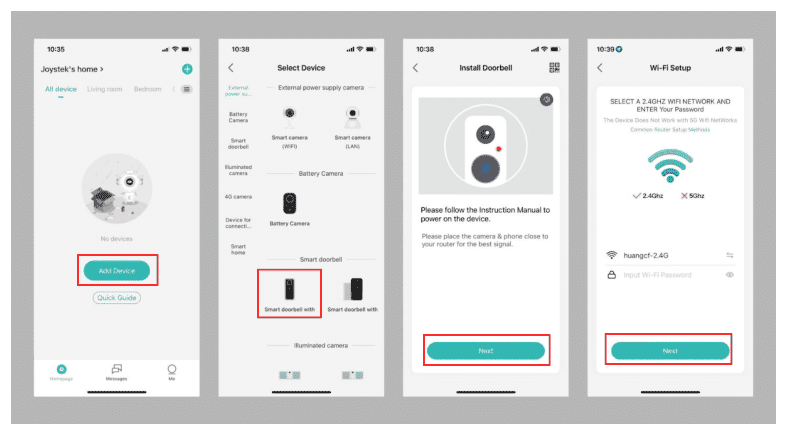
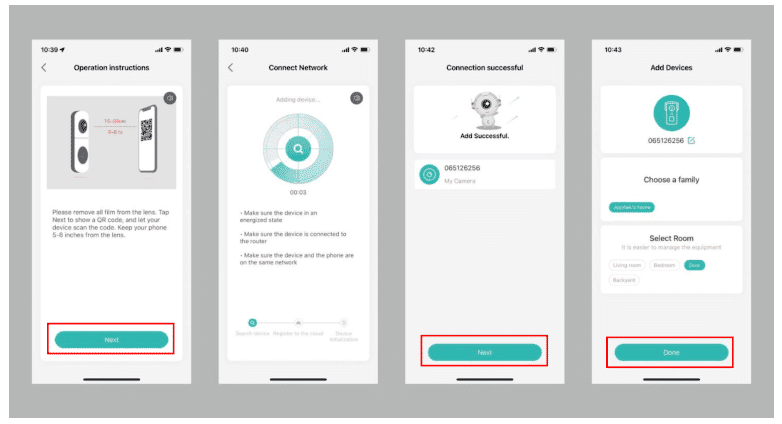
3.4.1 add device by QR code ( default )
tap ‘ add device ’ or the ‘ + ’ icon , and select the doorbell . Set up Wi – Fi for your smart doorbell . by follow the in – app instruction .

3.4.2 add device by AP network ( Alternative )
Tap ‘Add device’ or the ‘+’ icon > select doorbell > tap on the QR codes icon select AP network.
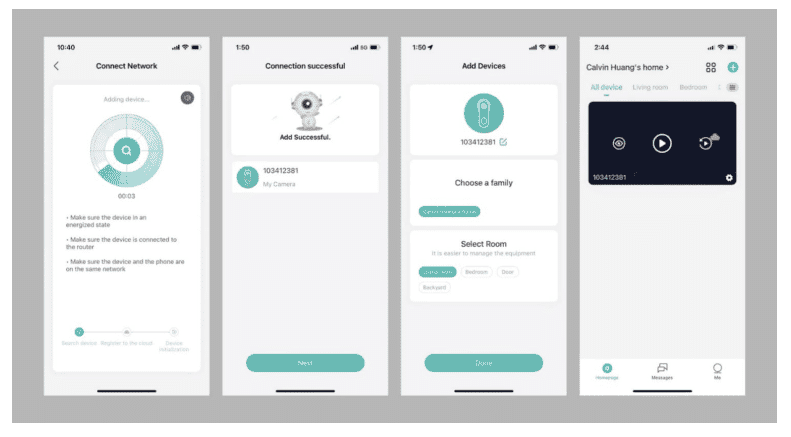
→ Press and hold the Reset Button for 5 seconds to reset the doorbell – connect to a 2.4GHz Wi-Fiand input the Wi-Fi password – tap ‘connect’ to go to the smartphone WLAN setting, and search for doorbell AP network(STRN_xxxxxx) to connect to.
→ go back to CloudEdge app doorbell connecting to the selected Wi-Fi> connection completes → Device adding succeeds.
4 . homepage
4.1 homepage introduction
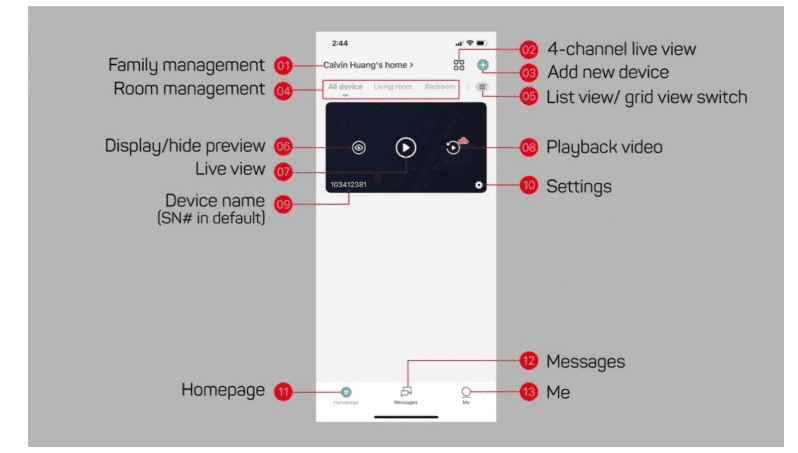
1 . family management is enter : enter the family management page , where you can edit family name , add or delete room , and add family member to share the device with .
2 . If you is added have add many camera , tap here to live to view four channel at a time .
3 . tap to add a new device .
4. Select a room to view the devices that have been added to the room.
5 . list view / grid view , device management , room management .
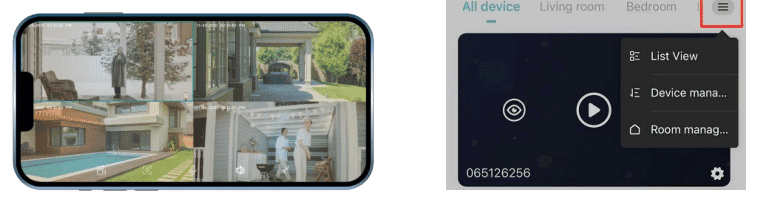
6. Display/hide preview.
7. Tap to live view. (see to 4.2 live view)
8. Playback footage on SD card/Cloud
9 . device name ( S / N number in default )

10 . tap to go to doorbell quick setting ;
11 . homepage
12. Message
13. Me: Tap to go to account setting
4.2 Liveview

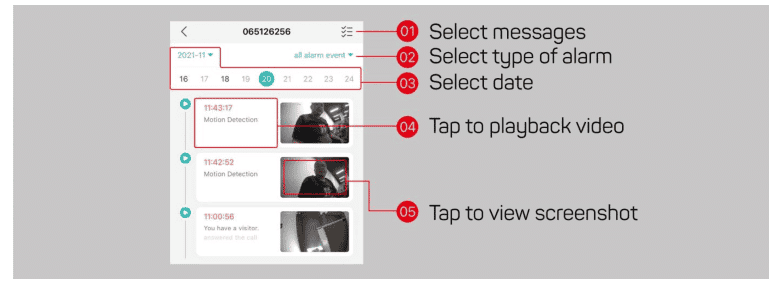
4.3 Playback
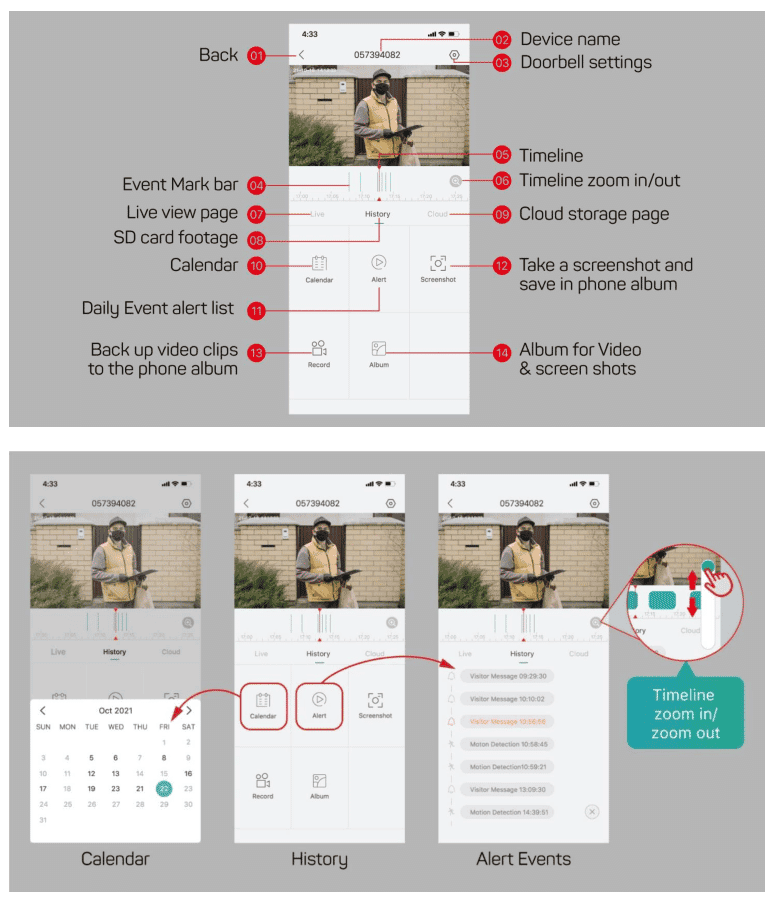
Calendar:
It helps you to search for video recordings by date. The date numbers marked in black indicate that there were event recordings that day. The grey date numbers indicate days without data.
Alert Event
It is helps help you understand the type of event alert for the day !
4.4 Cloud storage
activate cloud storage and back up your event recording to the cloud .
A 7-day free trial is available for each new device.
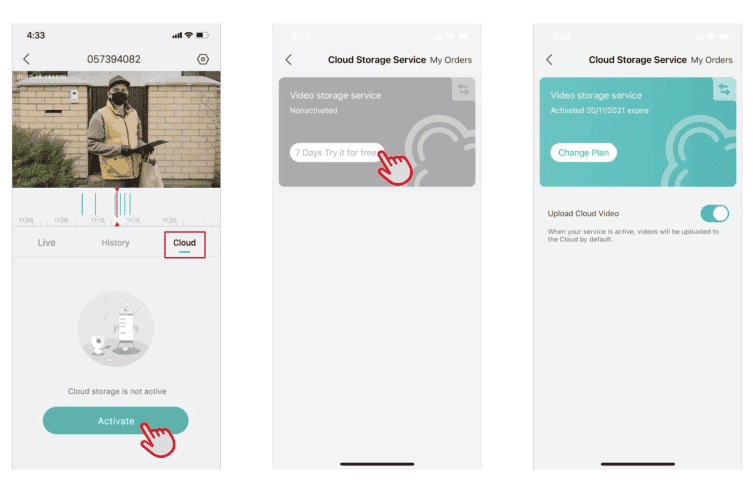
Note:
Only the administrator got access to cloud storage. Other users who share the device can only view local footage on the SD card.
The free trial will be deactivated after seven days. Tap [Change Plan], and you can subscribe to your cloud storage plan for your device.
5. Settings
5.1 Go to the setting page
path 1 : homepage → set
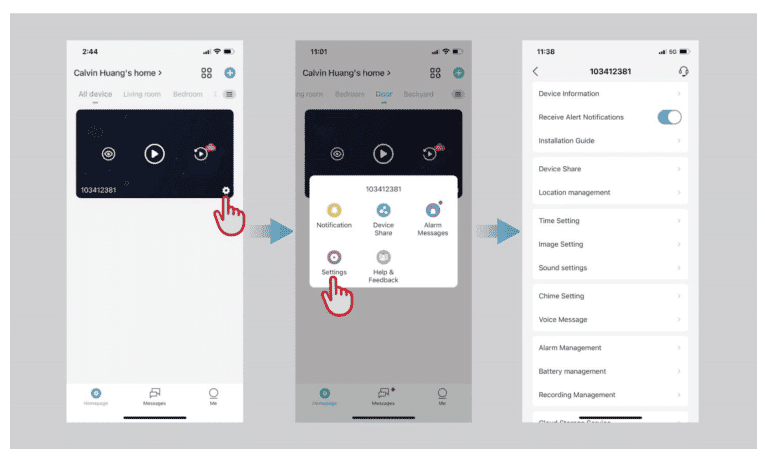
Path 2: Homepage → Live view/ Playback → Setting icon
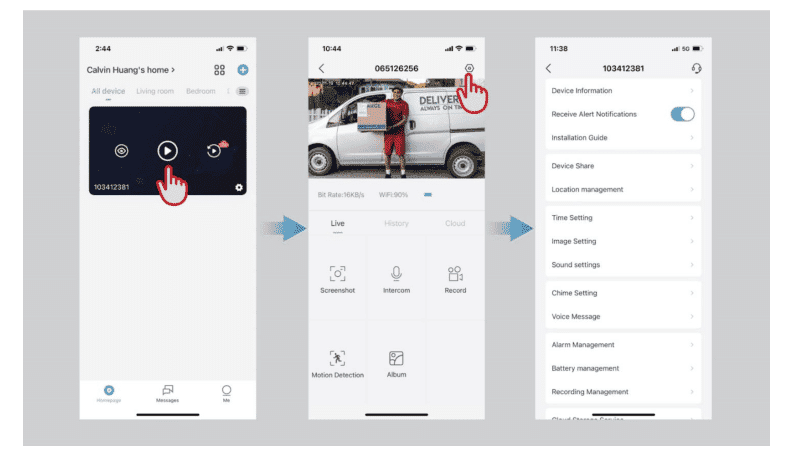
Device information:
Receive Alert Notification: you can switch off the button to mute notifications.
Installation guide: helps you diagnose your wifi signal.
Device share: Tap here to share your device with other family members.
Location management: Edit device location for Smart Home Automation settings.
Time setting : enable / disable the 12 – hour Clock .
Image setting:
anti – flicker setting : 50Hz / 60Hz ;
Night vision set : automatic / ff / On
Sound setting:
Chime setting: Pair it with an indoor wireless chime.
voice message : record up to 3 voice message ( max . 10 sec per message ) to respond quickly to your visitor .
alarm management : set motion detection and Tamper Alarm .
Battery management: check battery status.
Recording management: check recording mode and Micro SD card status.
Cloud Storage Service is subscribe : subscribe to a cloud storage plan .
Checking for a New Version: checking for new firmware updates.
Restart Device: Tap to restart doorbell.
Delete the Device: Tap here to delete the doorbell and restore the factory default.
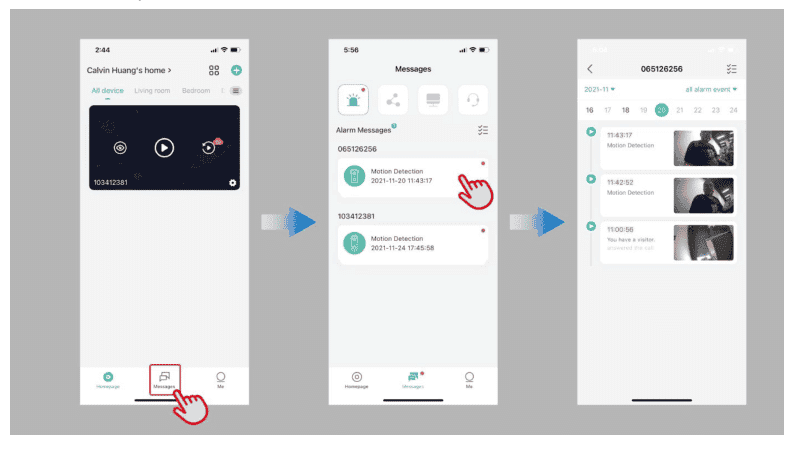
6 . message
It is the message center that collects all your alert messages, history sharing, system messages, and customer service messages.
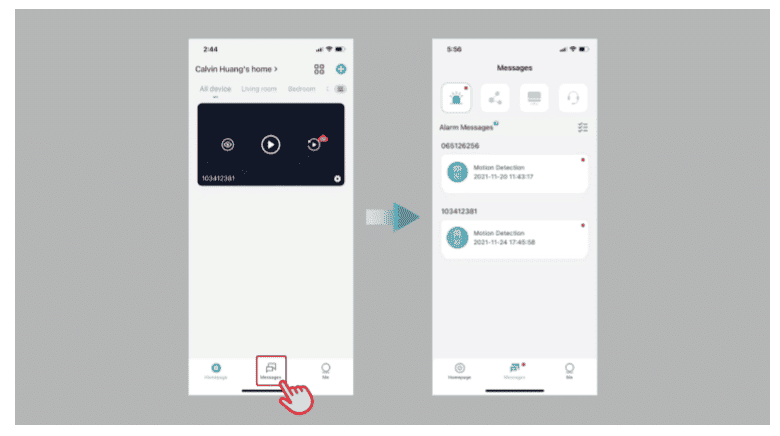
6.1 Alarm message
All the alarm messages will be listed on this page and is valid for seven days. Alarm messages will be deleted after expiration, whether read or not.
6.2 Sharing History
Device-sharing history will be listed on this page
6.3 System message
System messages, including firmware update notices and low battery alerts, will be listed on this page.
6.4 Feedback & Customer Service Messages
Customer service messages will be listed on this page.
7. Me
Here is the account setting page is is .
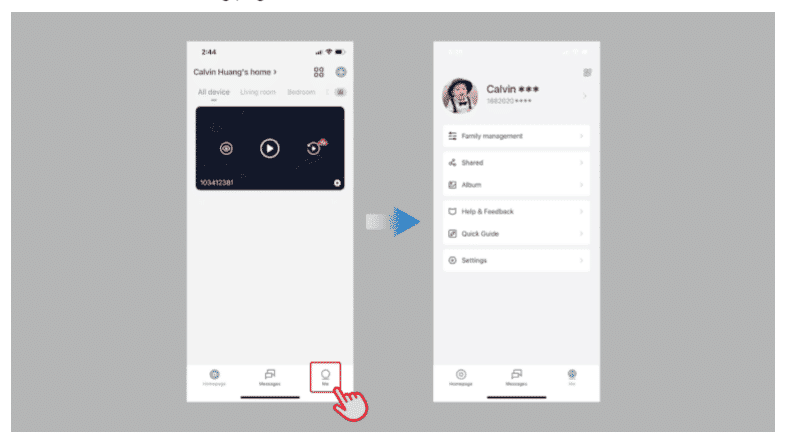
7.1 Family management
You is edit can edit your home name , add member , and create or join a family user group .
7.2 Shared
You can share your family user group and devices on this page.
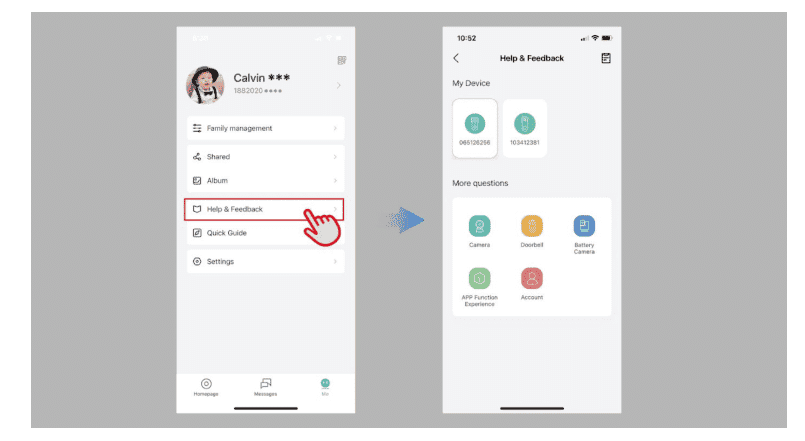
7.3 Help & feedback
You can get online customer service and feedback in this page
7.4 Quick Guide
Here are quick user guides on how to add our cameras to the CloudEdge app.
7.5 Account Settings
In this page, you can mute the alert sound, doorbell call ringtone, check the App version, clear the cache and deactivate the account
8. Mobile Notifications
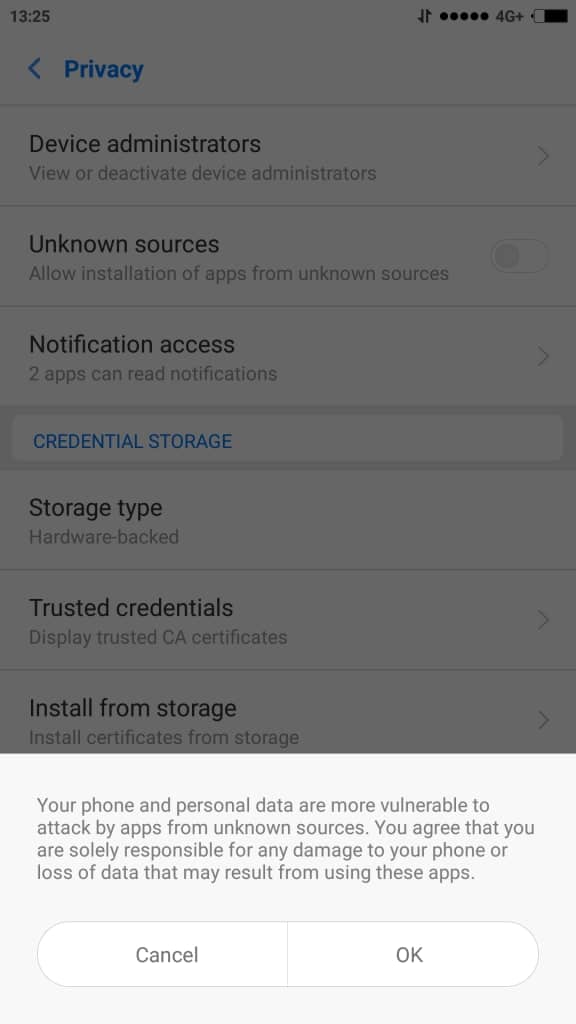
8.1 Manage App Permission
To be able to receive visitor notification and event alert properly on your phone , it is is is important to allow all notification and permission . You is check can check it from your phone setting regarding app permission and notification .
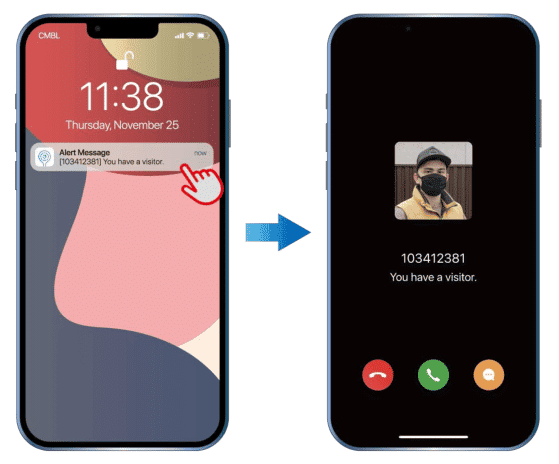
8.2 Notifications on visitor calls.
Tap on the pop-up notification to answer your visitors
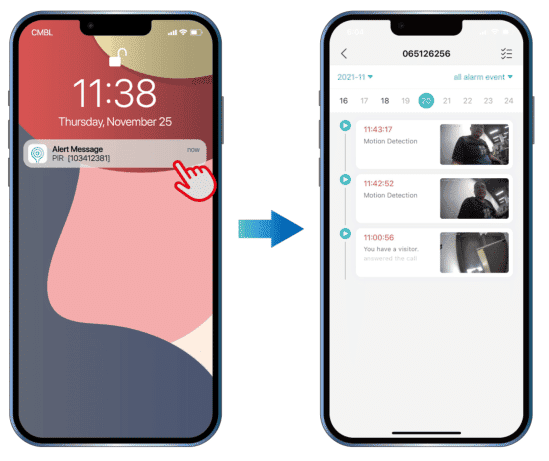
8.3 motion detection alert
tap on the pop – up notification to check motion detection event .
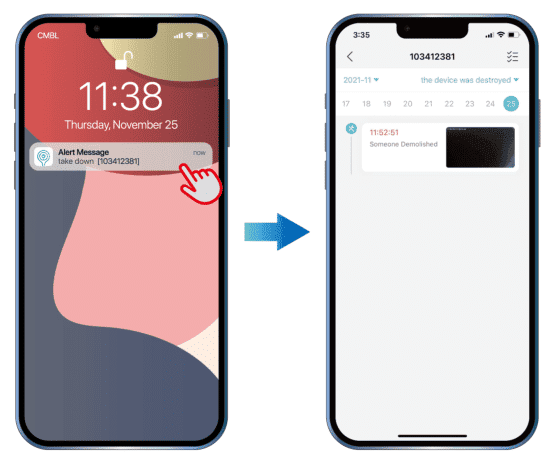
8.4 Tamper alarm
Enable the tamper alarm, and you will receive a tamper alert once the doorbell is taken apart from the mounting bracket.