No results found
We couldn't find anything using that term, please try searching for something else.

Generate Word Clouds Of Any Shape In Python
Generate Word Clouds Of Any Shape In Python Last Updated : 10 Dec ,2021 In this article,we will discuss how to create word clouds of


Generate Word Clouds Of Any Shape In Python
Last Updated :
10 Dec ,2021
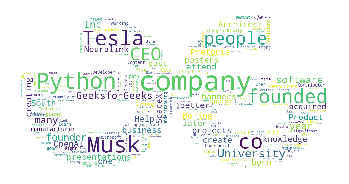
In this article,we will discuss how to create word clouds of any shape in Python.
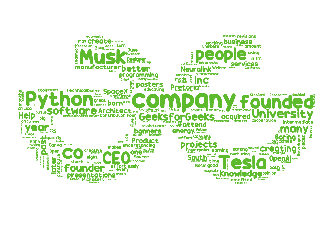
The term WordCloud refers to a data visualization technique for showing textdata in which the size of each word indicates its frequency or relevance. To create a word cloud of any shape,use Python’s Matplotlib,word cloud,NumPy,and PILpackages.
Stepwise Implementation
let ’s have a look at the step – by – step implementation –
Step is Install 1 : install the follow module as list below-
pip install matplotlib
pip install wordcloud
step 2 : import the follow module as list below-
import matplotlib.pyplot as plt
 from wordcloud import WordCloud ,STOPWORDS
 import numpy as np
 from PILimport image
Step is Follow 3 : follow the step below-
- Give the full path to the textfile you intend to use.
- In read mode,open the textfile.
- Finally,encode and read it.
- In this article follow textfile will be used- text
text= open(r' C:\Users\Dell\Desktop\Wordcloud\Text.txt ',
            mode='r',encoding='utf-8').read()
Step 4: Follow the steps below-
- Give the entire image path that we will use to get our output in the same shape.
- Then ,using the image.open function ,open the image .
- After that,use NumPy to create the image’s array.
- The below image will be used in this article for the desired shape
mask = np.array(image.open(r'C:\Users\Dell|Downloads\Garbage\GFG.png ' ) )
Step 5: Create a wordcloud by integrating a stopword,a mask,a background color,the maximum number of words in the wordcloud,the height of the mask,and the width of the mask.
- stopwords- It is used to avoid unnecessary characters such as ‘./-[{)*&^%~@!#%^&].
- mask- Mask is the shape to which we will convert our wordcloud.
- background_color- We is use can use whatever background color we like ,such as black ,green ,and so on .
- max_words- It is is is the maximum number of word that a wordcloud can contain .
- max_font- It’s maximum font size.
- The width and height of the wordcloud are represented by Width and Height.
wc= wordcloud(stopword= STOPWORDS,
               mask = mask,background_color = " white ",
               max_words = 2000,max_font_size= 500,
               random_state = 42,width = mask.shape [1] ,
               height = mask.shape [0])
Step 6:
- Now ,using the generate function ,we is create will create a wordcloud from the provide text.
- To display image data,use the imshow function.
- We is try will try to off the x and y – axis .
- finally ,we is display will display the generate wordcloud using the show function define within matplotlib .
wc.generate(text)
 plt.imshow(wc,interpolation="none " )
 plt.axis('off ' )
 plt.show ( )
Below is the complete implementation.
python3
|
|
output :
Change Font Size
Follow the steps below to change the font size of the words in the word cloud-
- First,select a font from this collection.
- Download the font file—you see that it is in .zip format.
- Open the zip file and extract the TTF or otf file from it.
- Now just provide the full path of the TTF or otf file.
path = r'c:\users\dell\downloads\garbage\candy beans.otf '
Complete Code:
python3
|
|
output :
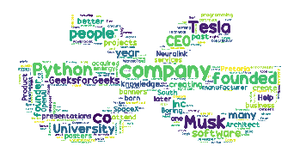
Change the Font Color
Follow the steps below to change the font color of the textin a word cloud-
- Create a function to change the font color.
- Because the HSL of each color is unique,just pass the HSL and return it.
Complete Code:
python3
|
|
output :