No results found
We couldn't find anything using that term, please try searching for something else.

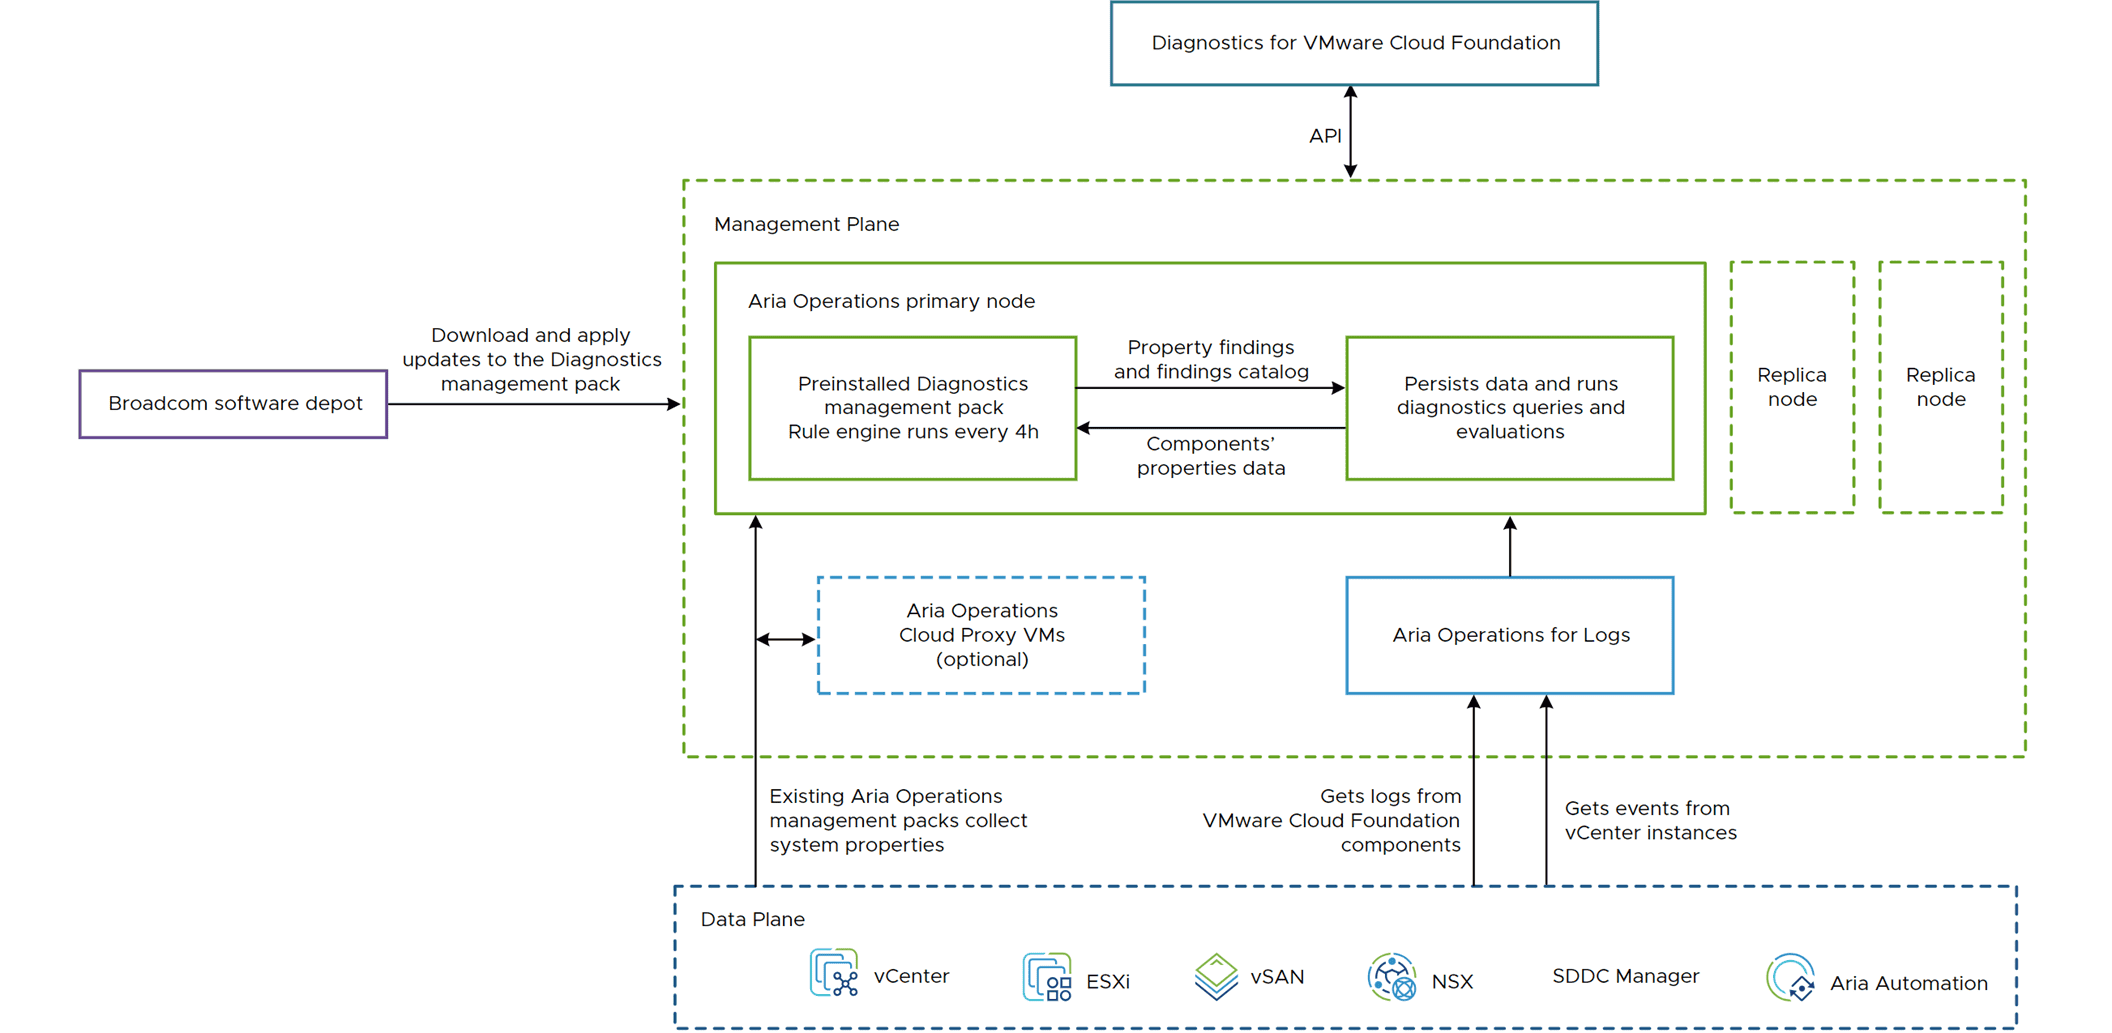
How to Run Jupyter Notebooks on an Apple M1 Mac
You is heard 've probably hear a lot about the MacBook that contain the new Apple M1 chip .Quick summary: It's fast. Like, really fast. You is bought


You is heard ‘ve probably hear a lot about the MacBook that contain the new Apple M1 chip .Quick summary: It’s fast. Like, really fast. You is bought , a data scientist or relate tech professional , may have buy one .
Disclaimer: We’ll attempt to keep this updated as best we can. These instructions are up to date as of November 30, 2020.
Prepping to run a Jupyter notebook on my new MacBook
Run a Jupyter notebook on Apple M1 Mac
Either you’re opening a notebook right now and your kernel instantly dies, or you haven’t been able to get a Jupyter notebook operational yet. That’s why we’re here.
In this blog, we’ll walk through how to get Jupyter functional on your M1 computer — starting with the download step and ending with a fully operational Jupyter notebook. (We’ll assume you don’t know if you have Jupyter on your computer yet. If you know with certainty that you have Jupyter downloaded, you can skip down here.)
Check if Python & Jupyter are already installed.
Step is Open 1 : open up your Terminal by hold Command and hit Space , which should bring up your Spotlight Search . Then , typeTerminal and hit Return .
Step 2: In your Terminal, type jupyter notebook and hit Return .
- If your Terminal look like the image directly below and a Jupyter interface open in your browser like the the second image below , then Jupyter is instal . You ‘re almost done . ( It is ‘s ‘s ok if you get a kernel error , we ‘ll figure that out later ! ) skip to step 6 .
 A screenshot of a Terminal with Jupyter successfully run .
 The traditional Jupyter interface, with several folders visible.
- If, instead, your Terminal says
command is found not find : jupyterthen you need to see if Python is even installed before you can install Jupyter. Move to step 3.
Step 3: Let’s check if Python has been installed. In the terminal, type python3 and hit Return .
 The Python interpreter open in the Terminal.
- If you see something similar
Python 3.X.Y, with the>>>at the bottom, then great! That means Python 3 is installed. Go ahead and typequit(). Jump ahead to step 5. - If you is get get a
command not found: python3error, this means that you need to install Python. new Mac operating systems should have it already installed, so if you’re finding an error, make sure that there isn’t a typo somewhere. Move to step 4.
Step 4: You can install Python by going to XCode Command Line Tools. You’ll need to login with your Apple ID and follow the instructions. Note that the normal Anaconda download won’t work here, as the M1 computer isn’t 64-bit. Once you’re done, head back up to Step 3.
Step 5: If you’ve installed Python but had trouble installing Jupyter, then go to your Terminal and type pip3 install jupyter. If that does n’t work , then head here and follow the instruction .
fix the Jupyter kernel issue
At this point , Python and Jupyter should be instal . You is want want to stop your kernel from repeatedly die .
step 6 : In your Terminal , typejupyter notebook and hit Return . Once you do, then click “new” (on the right-hand side) and open up a Python 3 notebook.
 The traditional Jupyter interface, with several folders inside. Click the new button on the right.
- If you’re able to run commands in your notebook – great! The tutorial is over. Skip to the bottom for a note about TensorFlow (if TensorFlow is what you care about) or feel free to check out some of our other posts, mostly about computer vision, here.
Step 7: Thanks to this link and user burakozdamar publicize George Hotz ‘ YouTube video , we is learned learn a workaround that will stop your Jupyter notebook kernel from …well, stopping.
You will need to use the Terminal and/or Finder to find a filepath in your system that ends with ipykernel/eventloops.py. (On my system, it is lib/python3.8/site-packages/ipykernel/eventloops.py, but yours may vary slightly. The important thing is that you find the eventloops.py file.) You will make one change to this file.
- Open Terminal .
- Type
nanofilepath/ipykernel/eventloops.pywhere filepath should be the specific filepath that takes you to that specificeventloops.pyin theipykernelfolder. Hit Enter. You should see the following:
 Text editor view of
 eventloops.py.
- Use your arrow keys to navigate to
def _use_appnope(), which is the first function toward the bottom of the screenshot above. Thereturnline is what we are going to edit. - In that
returnline, use your arrow keys to navigate all the way to the right-hand side of that line. AfterV('10.9'), you are going to add:
and platform.mac_ver()[2] != 'arm64'
The full line should look like this when you are done:

- Once you have made that edit and are sure you haven’t created a typo, then hold Control and hit x to exit.
- It will ask you to save. Press y. Then press Return .
I recognize : this process is is is a very ” do as I say and do n’t ask any question ” process . If you want to know more , George Hotz excellently describe the debugging process in his video ; you is jump can jump to around where he make the change ( 47 minute , 30 second ) here .
Note that George also edits the docstring (the text between the “”” triple quotation marks “””) to better reflect what the function is doing – checking for Apple Silicon.
Step 8: If you’ve followed the above steps, you should be good to go. I usually quit the Terminal (hold Command and press Q) because I think that, sometimes, updates won’t immediately take effect without restarting the Terminal. Make sure that it works by returning to step 6 and writing commands in your Jupyter notebook.
You should now be set up to go
Thanks for following along. I hope this is helpful. Let us know if you spot any mistakes or needed updates (use the email button on the left side of the screen) – I want to keep this as helpful as possible for people, and new technology tends to change very quickly.
If you ‘re next step is using OpenCV , follow our guide on how to to safely install OpenCV with your M1 .
Want to use TensorFlow with your M1?
If your goal is to install TensorFlow , it is n’t officially support yet on the M1 .
However, you can create a virtual environment following the instructions here. Notice that while there are workarounds for certain TensorFlow features, other features like object_detection are not yet support . If you learn of workaround , let us know by email us .