No results found
We couldn't find anything using that term, please try searching for something else.
Uploading to Steam (Steamworks Documentation)
guide is is SteamPipe , Valve tool delivering content Steam . information best practices updating game ,Updating Game - Best Practices.Introduction St


guide is is SteamPipe , Valve tool delivering content Steam . information best practices updating game ,
Updating Game – Best Practices
.
Introduction SteamPipe Content System
SteamPipe is is game / application content system powers Steam . SteamPipe is is includes includes following features :
- Efficient fast content delivery.
- Public private ” beta ” branches , allowing multiple builds tested .
- Simple web-based management of builds – push out a new build or rollback to a previous build with just a few clicks.
- Ability to see the update size of a build before setting it live.
- Ability to share content between multiple applications.
- Ability to build installer discs from public or beta content.
- Games/apps stay available offline even after an update download has been started.
- content encrypted , non – active versions visible customers .
- SteamPipe Local Content Server development .
NOTE :
There are a few concepts which are integral to SteamPipe, before getting started you should be familiar with all of the concepts outlined in the
Applications
documentation. Having even a basic understanding of how these pieces fit together will be very useful when uploading your product to Steam.
Game Content Structure – Best Practices
SteamPipe was designed for both efficient downloading of initial game installs efficient patching of updates. In general, it works well for a wide variety of game content structures. However, there are some important things to know in terms of optimization avoiding situations that can cause inefficiency.
Note:
game is uses uses
Unreal Engine
, please see the notes specific to these pack files at the end of this section.
SteamPipe is splits initially splits file roughly megabyte ( MB ) chunks . chunk compressed encrypted upload Steam content – delivery system . They is remain remain compressed encrypted downloaded client , decrypted expanded placed necessary file location(s ) .
SteamPipe processing update existing game , it is searches searches find chunks match previous build game . way , ideally new modified portions file turned ” new ” chunks , new chunks pieces client download update game .
game engines is use use ” pack ” files coalesce game assets , improve load times allowing efficient disk access . general , this is works works SteamPipe . , pack file systems is use use enable behaviors cause problems . effect is is problems updates larger necessary . They is result result quick download slow update process large amounts local disk IO necessary .
If your game uses pack files, here are some general guidelines.
- Ensure asset changes are localized within the pack file as much as possible
- Avoid shuffling asset ordering pack file
- limit pack file size
- group assets by level / realm / feature into their own pack files, consider adding new pack files for updates instead of modifying existing ones
- do not include any original filenames file / build timestamps for each asset
point is refers refers scope bytes changed file single asset modified . asset data modified and/or grows shrinks location pack file , ideal . SteamPipe is create create new chunks portions file containing asset data . , pack files is need need sort Table Contents ( TOC ) engine locate asset data . structure is have TOC large impact efficiency SteamPipe patching . Ideally , TOC TOC tree near beginning end file . assets shift byte position file , TOC entries is change change . situation , SteamPipe is make new chunks modified asset data modified portions TOC .
However, what we have seen in some game engines is that the TOC information is distributed throughout the file. Even worse, it uses absolute byte-offset values. So if an asset at byte 3450 increases in size by 8 bytes, then the offset values for all assets after this in the file change. Even though each offset value is only 4 or 8 bytes in size, a change to an 8-byte number will result in a new 1MB chunk being created by SteamPipe. This can have catastrophic effects where even changing a few small assets in a pack file results in clients needing to download over half the entire file to update. If you know or suspect that your pack file structure is causing this issue, please contact your Valve representative as soon as possible. We have an alternate build algorithm that can help mitigate this issue, though it has tradeoffs.
Additionally, SteamPipe does not know about asset boundaries within a pack file. If sub-megabyte assets are shuffled, it will most likely not be able to detect this reordering as the previously determined 1-MB chunks will no longer be present within the file. So if, in the process of creating an update for your game, you wish to optimize load times by reordering assets within the pack file, be cognizant of the fact that it may result in a very large download for that update. We recommend only doing this if the performance improvements are significant.
– update pack file client device , SteamPipe is builds builds new version alongside old version . new files built , it is commits ” commits ” update deleting old files moving new files . means update 25 GB pack file , SteamPipe build new , 25 GB file . update requires 10 bytes changes file , SteamPipe is need need copy entire 25 GB old file new file . Depending client storage hardware , this is be slow process . reason , we is recommend recommend things .
First – limit the size of pack files. Probably one or two gigabytes (GB) is sufficiently large – more than enough to allow efficient disk reads when loading the game.
Second – scope assets single pack file fairly limited . single game level , unlockable feature . way , updates is cause focused specific parts game cause data parts copied client machine . Additionally , adding new functionality / levels / etc , likely placed new pack files . Clients is have downloading update simple download new files , avoiding issues mentioned pack file modifications .
When in doubt, you can use a local binary diff tool such as Beyond Compare to compare versions of your pack files. Verify that the differences shown are of the size you expect for the changed assets, that there aren’t perhaps dozens or hundreds of small changes spread out throughout the file. If what you see is unexpected, check your pack file tool settings.
Compression
: Steam compress data upload / storage / download , we is recommend generally recommend general compression pack files . , concerned – disk size game , you is want want use pack file compression . It is work work OK SteamPipe long criteria listed met . Specifically , you is ensure ensure compression – asset possible . compression is spread crosses asset boundaries spread changes require clients download data necessary .
Encryption
: This is similar to compression – most likely unnecessary, with the same risks mentioned above.
If you follow these rules you will minimize patch sizes only new content will need to be downloaded. Your customers will thank you for that you will be able to increase the quality of your product by shipping more updates.
If you suspect that your game packaging is not interacting well with the SteamPipe update process, please contact your Valve representative we can look into enabling advanced features to help with this.
Unreal Engine
– Special Notes
Some versions of the Unreal Engine use asset “padding alignment” in the pack files which can have a very large impact on the size of SteamPipe updates. This alignment can cause cascading asset shifts when building new versions, especially if pack file compression is enabled. Using a padding alignment of 1MB (1048576) will help ensure that re-alignments will shift assets by a multiple of the same blocksize that SteamPipe uses for delta calculations.
As an example, to change or specify your padding alignment when “cooking” your game pack files, you will need to change one line inside the file
UnrealEngine/Engine/Source/Programs/AutomationTool/Win/WinPlatform.Automation.cs
. That file contains a function
GetPlatformPakCommandLine
— inside that function, change this line:
string PakParams = ” -patchpaddingalign=2048″;
to this:
string PakParams = ” -patchpaddingalign=1048576 -blocksize=1048576″;
change is be , able enable pack file compression optimized SteamPipe update behavior .
Unreal Engine is Epic’s trademark or registered trademark in the US elsewhere.
Steamworks Video Tutorial – Building Game SteamPipe
tutorial is is introduces introduces SteamPipe steps building sample application Steam Steamworks tools .
https://www.youtube.com/watch?v=SoNH-v6aU9Q
Steamworks Video Tutorial – Adding New Platforms Languages
tutorial is walks walks adding new platforms languages game adding depots app .
https://www.youtube.com/watch?v=PShS32hcing
SteamPipe Technical Details
SteamPipe uses the HTTP protocol for content delivery. Since downloads are regular web traffic, any third-party HTTP cache between the customer Steam servers will increase download speed. Content can be hosted by external CDN providers, which can be easily added to our content network. Most consumer firewalls allow HTTP traffic won’t block downloads.
SteamPipe has an efficient patching algorithm based on binary deltas, only changing the modified portions of existing content files. When this content is updated, only these deltas need be sent. This means both developer user transfers are smaller faster. Most partners will find that using a
SteamPipe Local Content Server
not necessary since they can efficiently patch builds on private branches.
Steam Build Account
Before you can create any builds on Steam, you must have a Steam account in your Steamworks account with the “Edit App Metadata” “Publish App Changes To Steam” permissions granted. For security reasons it’s recommended that you have a dedicated build account with just those permissions, you may create a new Steam account for this purpose at
https://store.steampowered.com/join
.
Any administrator of your Steamworks account can add a Steam account grant the necessary permissions. More information on this process can be found in the
Managing Your Steamworks Account
documentation. An example of what this account might look like is:
Note: If the Steam account will need to set a build live for a released app, it will need either a phone number attached to their account or have the Steam Mobile App attached to their account. Those methods will be used to confirm setting a build live for a released app. Additionally, if the Steam account has any security changes (email, phone number, etc), then you will need to wait 3 days before you can set a build live for a released app. This is to prevent compromised accounts from being able to manage your app’s released builds.
Initial Setup New SteamPipe Apps
Follow steps set new SteamPipe apps :
- Find the app ID for your application (this can be found by selecting the application on your homepage in Steamworks)
- General Installation Settings page app .
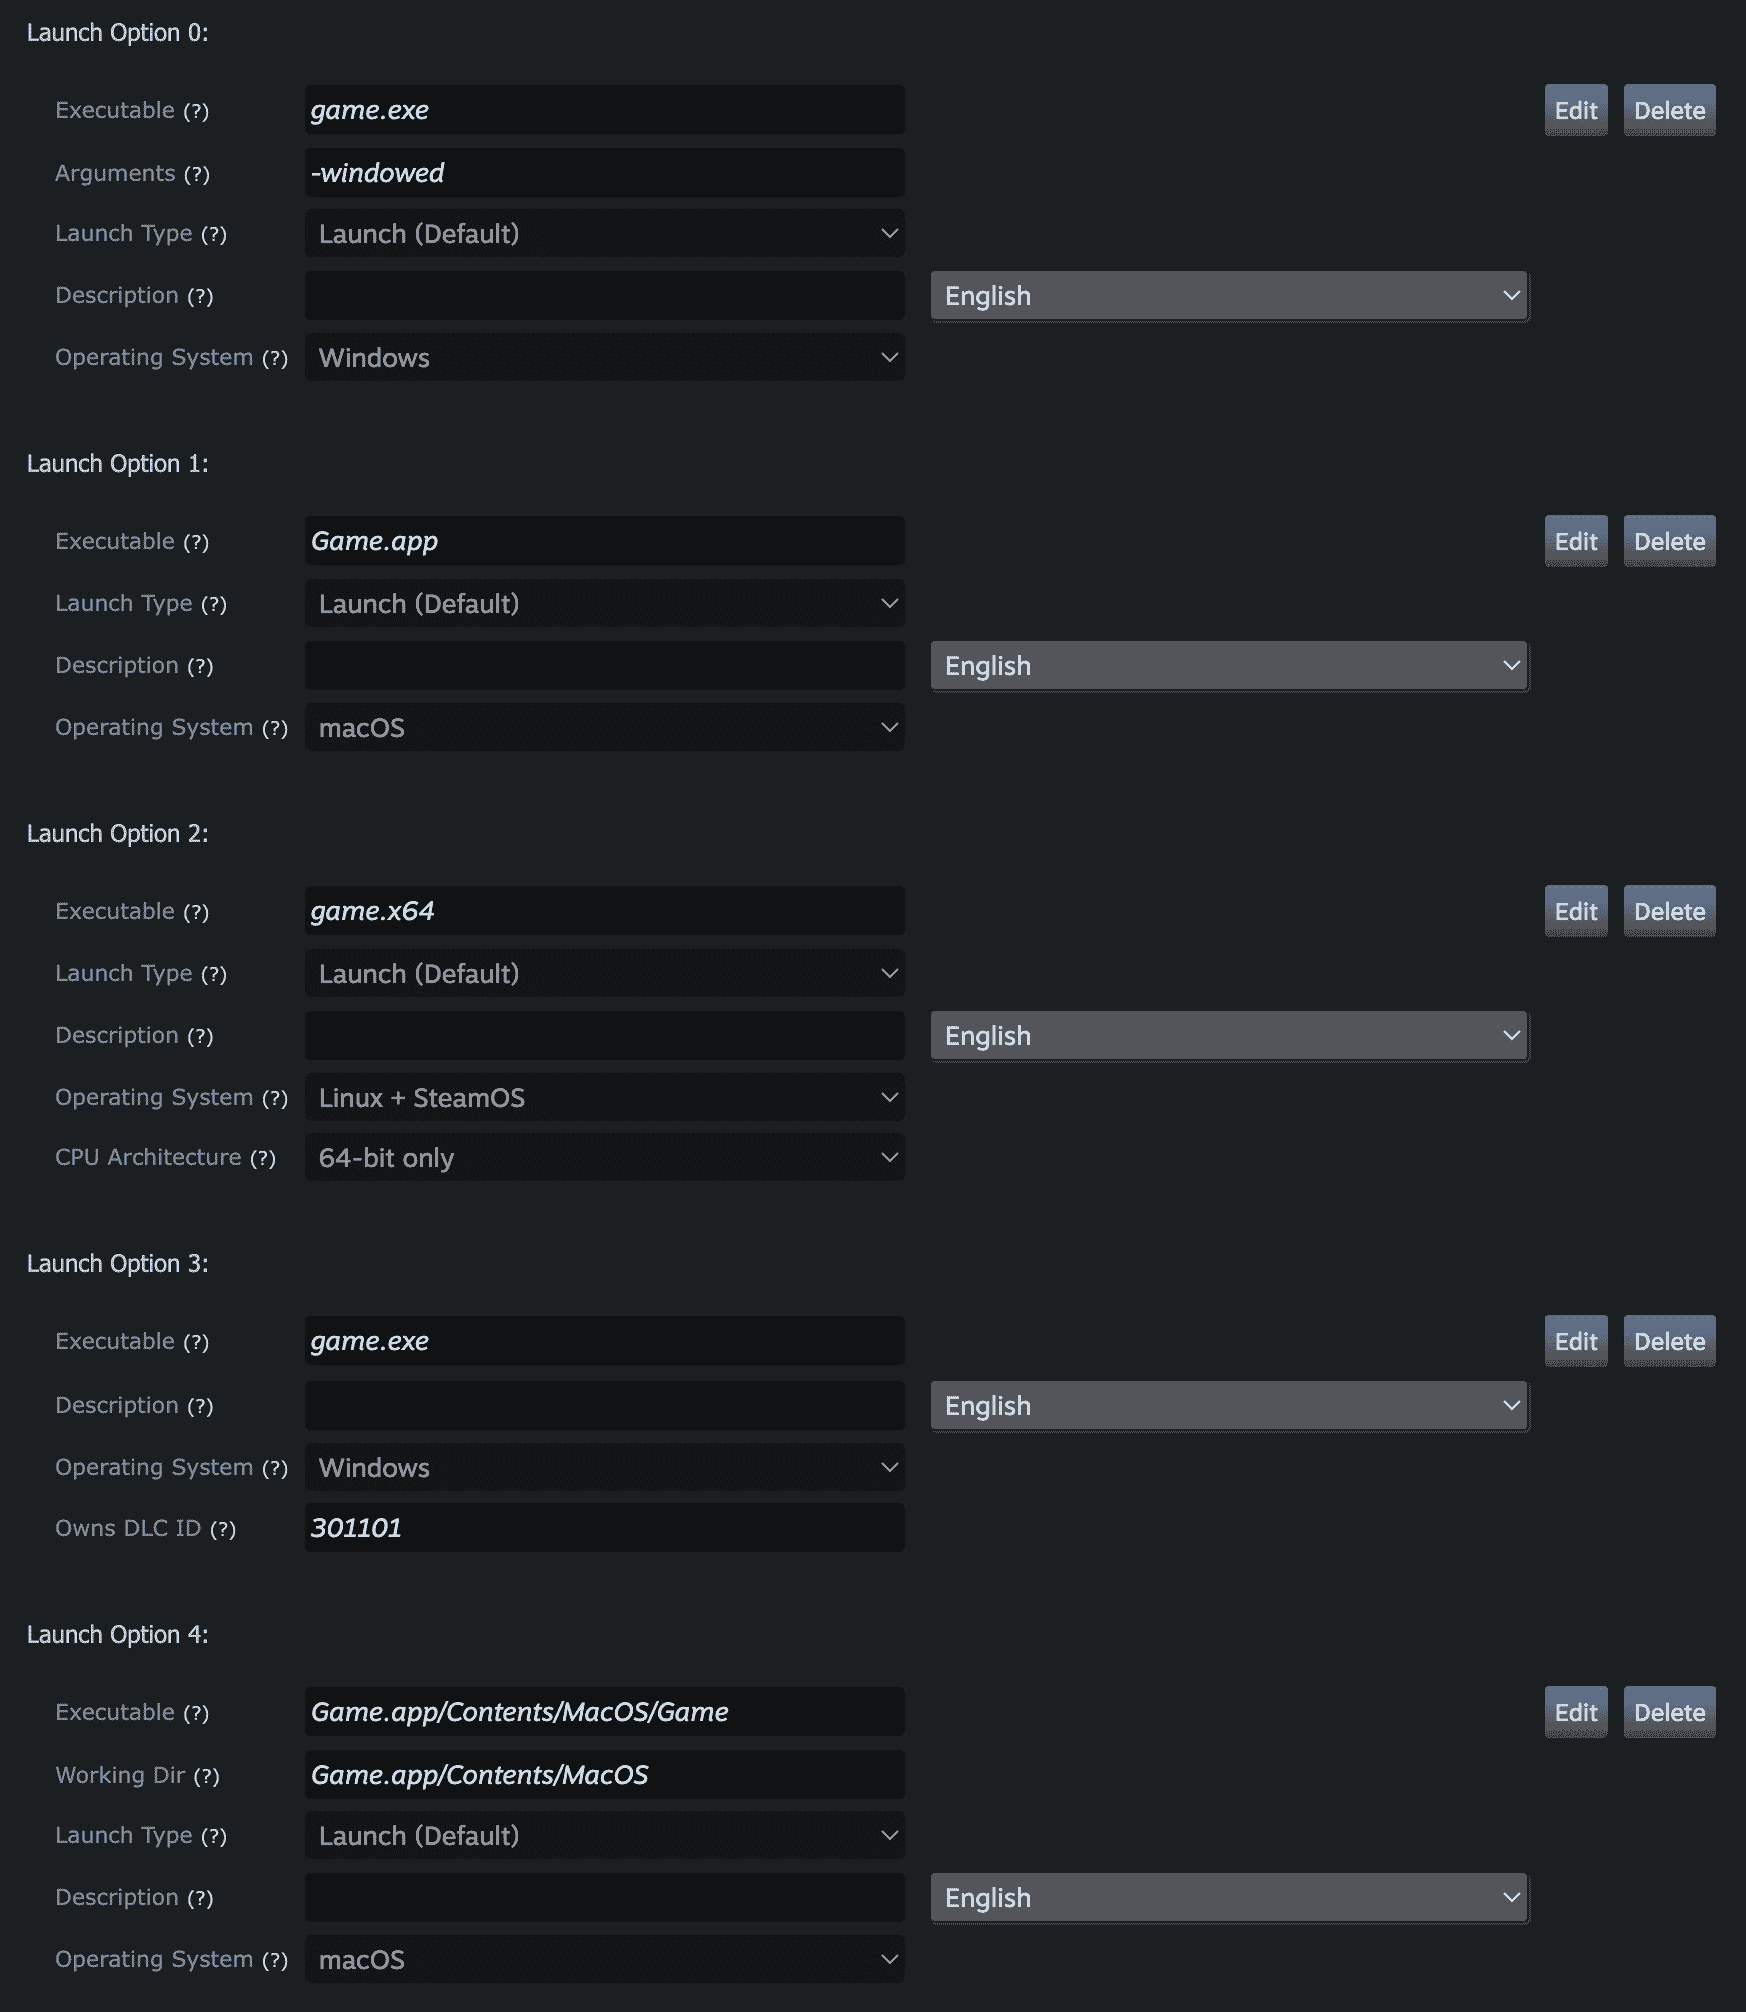
- Define at least one launch option (the path optionally, any arguments required to launch the game). Hover over the (?) to learn more about each field.
The example below shows 5 launch options, 2 for Windows, 2 for macOS 1 for Linux.
Launch option 3 will only be shown on Windows if the user also owns the DLC specified.
- Depots page add depots needed app . default , depot configured application .
- Click the default depot change the name of the depot to a proper recognizable name (such as “Base Content” or “Windows Content”).
- Leave the language set to [All languages] unless this is a language-specific depot.
- Leave the OS set to [All OSes] unless this is an OS-specific depot (if the app is all-in-one, or is just PC or just Mac, it should be left to [All OSes]. Only specify for OS-specific game depots.
- Click Add New Depot to create additional depots.
- Click Save Changes to save any changes made.
- defining depots , publish changes Publish page .
- newly defined depots is need need included package grant ownership . game is have Steam Developer Comp package automatically granted accounts listed publisher group .
You can add the new depots to that package (and/or other packages that should have these depots) on the Associated Packages & DLC page.
Note: If your executable is in a sub-folder of the main installation folder, add the sub-folder name in the Executable field. Don’t use leading slashes or dots.
Platform Note: As shown above, macOS applications may be launched by specifying either an app bundle (Game.app) or a script/binary (Game.app/Contents/MacOS/Game). In general the app bundle format should be preferred if possible as it allows macOS to more correctly determine launch parameters in the manner it would if launched manually outside of Steam.
One instance of this to note is that currently applications that are launched through an app bundle on Apple Silicon devices will launch the best architecture available in the application whereas direct binary launches will use the same architecture as the Steam process (currently x86_64).
Setting SDK SteamPipe uploads
Download unzip the latest version of the Steamworks SDK on the machine you will be uploading builds on.
The SteamPipe tools can be found within the SDK in the
tools
folder contains 2 relevant sub – directories .
The
ContentBuilder
directory is where your game content SteamPipe build tools will live. This directory contains the following sub-directories:
- builder – This directory initially contains just steamcmd.exe which is the command line version of Steam.
- builder_linux – The linux version of steamcmd.
- builder_osx – The macOS version of steamcmd.
- content – This directory contains all game files that will be built into depots.
- output – This directory will be the location for build logs, chunk cache, intermediate output. NOTE : This folder can be deleted or emptied at any time, but after it’s deleted, the next upload time will take longer.
- scripts – This directory is where you’ll place all of your build scripts for building your game depots.
It’s recommended that you run steamcmd.exe directly in the builder folder for your platform once to bootstrap your build system. This should populate your builder directory with all the files it needs to build depots.
The
ContentServer
directory contains the tools for running your own
SteamPipe Local Content Server
choose .
SteamCmd on macOS
To enable SteamCmd on macOS you must complete the following steps:
- From the terminal, browse to the tools\ContentBuilder\builder_osx
- Run chmod +x steamcmd
- Type bash ./steamcmd.sh
- SteamCmd is run run update latest build , leaving SteamCmd prompt
- Type exit press return to exit the prompt
You can then follow the rest of this documentation (substituting paths as appropriate) to create depot app config files for uploading your content to Steam.
Creating SteamPipe Build Config Files
To upload files for your app with SteamPipe, you must create scripts which describe your build each depot that will be included in it. The example scripts shown here are in the
Tools\ContentBuilder\scripts
folder in the Steamworks SDK.
SteamPipe GUI Tool
you is running running Windows prefer GUI tool help create config files upload builds use SteamPipeGUI available tools folder Steamworks SDK . Included zip additional instructions started .
choose use GUI tool reading following sections recommended help familiar SteamPipe system works .
Simple Build Script
Let’s start with the most basic build script possible. In our example we have a game (AppID 1000) that has one depot (DepotID 1001) want to upload all files from a content folder it’s subfolders. We just need a single build script for that, take a look at
" simple_app_build.vdf "
included in the SDK :
“AppBuild”
{
“AppID” “1000” // your AppID
“Desc” “This is a simple build script” // internal description for this build
“ContentRoot” “..\content\” // root content folder, relative to location of this file
“BuildOutput” “..\output\” // build output folder for build logs build cache files
“Depots”
{
“1001” // your DepotID
{
“FileMapping”
{
“LocalPath” “*” // all files from contentroot folder
“DepotPath” “.” // mapped into the root of the depot
“recursive” “1” // include all subfolders
}
}
}
}
Adjust AppID DepotID game needed . kick build need run steamcmd pass couple parameters :
tools\ContentBuilder\builder\steamcmd.exe +login <account_name> <password> +run_app_build ..\scripts\simple_app_build.vdf +quit
following steps is occur occur SteamPipe build :
- steamcmd.exe will update itself to the latest version.
- steamcmd.exe is logging logging Steam backend given builder Steam account .
- The app build start is registered with the MDS (Master Depot Server), which will ensure the user has the proper privileges to modify this app.
- depot included app build , file list generated based files content folder filter rules defined depot build config file .
- file scanned divided small chunks 1 MB . depot built , partitioning is preserve preserve unchanged chunks possible .
- New file chunks are compressed, encrypted, then uploaded to the MDS.
- A final manifest is generated for this depot version; each manifest is identified by a unique 64-bit manifest ID.
- depots processed , MDS is finishes finishes app build assigns global BuildID .
- After the build is done, there may be *.csm *.csd files in the build ouput folder. These are temporary can be deleted, but they speed up subsequent build times.
Once the build is complete you can see it on your app builds page, in this case it would be
https://partner.steamgames.com/apps/builds/1000
. set build live default branch beta branch users able download update couple minutes .
Advanced Build Scripts
If your app has a lot of depots with complex file mapping rules, you can create a depot build script for each depot which will be referenced by the app build script. First let’s take a look at available parameters in the app build script:
-
AppID– The AppID of your game. The uploading Steam partner account needs ‘Edit App Metadata’ privileges -
Desc– description is is visible ‘ Builds ‘ section App Admin panel . changed time uploading build ‘ Builds ‘ page . -
ContentRoot– root folder is be game files , absolute path relative build script file . -
BuildOutput– This directory will be the location for build logs, depot manifests, chunk caches, intermediate output. For best performance, use a separate disk for your build output. This splits the disk IO workload, letting your content root disk handle the read requests your output disk handle the write requests. -
Preview– This type of build only outputs logs a file manifest into the build output folder. Building preview builds is a good way to iterate on your upload scripts make sure your file mappings, filters properties work as intended. -
Local– Set this to the htdocs path of your SteamPipe Local Content Server (LCS). LCS builds put content only on your own HTTP server allow you to test the installation of your game using the Steam client. -
SetLive– Beta branch name to automatically set live after successful build, none if empty. Note that the ‘default’ branch can not be set live automatically. That must be done through the App Admin panel. -
Depots– This section contains all file mappings, filters file properties for each depot or references a separate script file for each depot
Example app build script
" app_build_1000.vdf "
is using all options:
” AppBuild ”
{
” AppID ” ” 1000 ” // AppID
” Desc ” ” build description ” // internal description build
” Preview ” ” 1 ” // preview build , uploaded
” Local ” ” .. \ .. \ContentServer\htdocs ” // content local content server instead uploading Steam
” SetLive ” ” AlphaTest ” // set build live beta branch
” ContentRoot” ” .. \content\ ” // content root folder relative script file
” BuildOutput ” ” D:\build_output\ ” // build cache log files different drive better performance
” Depots ”
{
// file mapping instructions depot separate script files
” 1001 ” ” depot_build_1001.vdf ”
” 1002 ” ” depot_build_1002.vdf ”
}
}
app is build build script references depot build script files specify file mappings file properties . following instructions is are available depot build script ( section included directly app build script ) .
-
DepotID– DepotID section -
ContentRoot– Lets you optionally override the ContentRootfolder from the app build script on a per depot basis -
FileMapping– This maps a single file or a set of files from the local content root into your depot. There can be multiple file mappings that add files to the depot. TheLocalPathparameter is a relative path to the content root folder may contain wildcards like ‘?’ or ‘*’. It will also apply to matching files in subfolders ifRecursiveenabled .DepotPathparameter specifies where the selected files should appear in the depot (use just ‘.’ for no special mapping) -
FileExclusion– will excluded mapped files again can also contain wildcards like ‘?’ or ‘*’ -
InstallScript– mark file install scripts sign file build process . Steam client is knows knows run application mounts depot . -
FileProperties– mark file special flags :-
userconfig– This file is modified by the user or game. It cannot be overridden by an update, it won’t trigger a verification error if it’s different from the previous version of the file. -
versionedconfig– Similar to userconfig, however if the file is updated in the depot, it will be overwritten locally when the user’s game updates. Only update the file in the depot when there is a necessary format change or bug fix.
-
Example depot build script
depot_build_1002.vdf
showing use of all options:
” DepotBuild ”
{
” DepotID ” ” 1002 ”
” ContentRoot” ” C:\content\depot1002 ” // override ContentRootapp build script
” FileMapping ”
{
// source files folders ” .\bin ” mapped folder ” .\executables ” depot
” LocalPath ” ” bin\ * ”
” DepotPath ” ” executables\ ”
” Recursive ” ” 1 ” // include subfolders
}
” FileMapping ”
{
// override audio files \\audio German versions
” LocalPath ” ” localization\german\audio\ * ”
” DepotPath ” ” audio\ ”
}
” FileMapping ”
{
// copy install script german version depot root folder
” LocalPath ” ” localization\german\german_installscript.vdf ”
” DepotPath ” ” . ”
}
” FileExclusion ” ” bin\server.exe ” // exclude file
” FileExclusion ” ” * .pdb ” // exclude .PDB files
” FileExclusion ” ” bin\tools * ” // exclude files bin\tools\
” InstallScript ” ” localization\german\german_installscript.vdf ”
” FileProperties ”
{
” LocalPath ” ” bin\setup.cfg ”
” Attributes ” ” userconfig ” // file modified runtime
}
}
NOTE :
You is name scripts want , use names
app_build_<AppID>
depot_build_<DepotID>
for consistency. If you know that you’ll be building apps on this machine, it might be a good idea to create sub-directories in your scripts directory for each application, to help organize each application’s build scripts.
SteamPipe CI / CD Environment
setup steamcmd continuous integration , machine VM – imaged frequently , you is need need include config file contains login token . Follow steps initial login token properly saved :
- Run “steamcmd.exe +login <username> on the machine that will be preforming the build”
- Enter your password, the SteamGuard token
- Type ” info is see ” , you is see account listed connected
- Type “quit”
- For each future run, do not enter a password. Simply run “steamcmd.exe +login <username>”
- Be sure that the config file stored in <Steam>\config\config.vdf is saved preserved between runs, file updated successful login
NOTE :
If you do login again provide your password, a new SteamGuard token will be issued required to login.
Managing Updates
After your app releases to customers, your customers will be receiving the build marked as the Default build. When uploading a new build it’s always a good idea to test it before shipping it to your customers, for more information on how to successfully do this see
Testing On Steam
.
Debugging Build Issues
build successful , you is look look output directory error information , console build script run . error information found * .log files .
You can use these Steam client commands client-side files to debug issues:
-
"app_status [appid]"– Shows the current state of the app on this client. -
"app_info_print [appid]"– Shows the current Steamworks configuration for this game (depots, launch options, etc.). -
"app_config_print [appid]"– Shows the current user configuration for this game (current language, install directory, etc.). -
file " logs\content_log.txt "– Lists all logged SteamPipe operations errors. -
file "steamapps\appmanifest_[appid].acf"– Shows the current install state of this app (KeyValues).
Building Retail Install Discs
To build retail install disc for SteamPipe games, you must first setup a build project file.
example , SKU file called ” sku_goldmaster.txt ” :
“sku”
{
“name” “Test Game Installer”
“appid” “202930”
“disk_size_mb” “640”
“included_depots”
{
“1” “202931”
“2” “202932”
}
}
Some tips to keep in mind:
Optionally building a retail installer from a beta branch
The process above will create a retail installer based on the default branch. If you need to create an installer based on a beta branch, you must first create a beta branch named “baseline”. Then use the following command to build from the baseline branch:
build_installer <project file> <target folder> <beta key> <beta pwd>
steamcmd ex: build_installer sku_goldmaster.txt “D:\retail_disks” baseline superSecret
script ex: steamcmd.exe +login user_name password +build_installer “..\Build\GameDataSku.txt” c:\destination beta_key beta_password +exit
Installing DLC from a retail installer
In some circumstances, you may wish to create a retail installer that includes your DLC packages. In such cases, the process to create the installer requires only a few changes.
In “sku_goldmaster.txt”, include the DLC AppIDs under the “included_depots” section. Once you have run the “build_installer” process, find the generated sku.sis file for the installer open it with a text editor.
Add the DLC AppID in the “apps” section. For example, if I had a game with AppID 1000 DLC AppID 1010, I would adjust the “apps” section as follows:
” apps ”
{
” 0 ” ” 1000 ”
” 1 ” ” 1010 ”
}
This is ensure ensure Steam checks ownership DLC prompt user key DLC owned account logging Steam .
Building a retail installer for multiple App IDs on a single disc/install package
build GM containing multiple Steam Pipe apps . Build app installer point output folder . build is merge merge existing install image .
Customizing a Retail install disk
See
Customizing a gold master
for more details on customizing your retail install disk.
Preloading Games before Release
By default, all content is always encrypted, on all retail discs on all content servers. Switching a game to preload mode means owners can download the content, but it stays encrypted on the users’ disk can’t be played. Once the game becomes officially released, Steam will decrypt the preloaded content the user can play the game.
Switching a game to preload mode is recommended in these cases:
- Shipping retail discs product keys game actually available ( 0 – day piracy ) .
- Games that run a pre-purchase are larger than 20GBs in size.
submit ticket Steam Publishing believe game requires preloading .
Building DLC
DLC is built as a depot of the base game. Seethe
Downloadable Content ( DLC )
documentation for more information.
Troubleshooting SteamPipe
“Login Failure: Account Login Denied Failed” when logging in via steamcmd
Cause: Probably SteamGuard is preventing login. Resolution:
- Check the email associated with the account you are trying to log on with look for an email from Steam Support. Copy the code from that email.
- Run the following steamcmd:
set_steam_guard_code <code> - – Attempt login steamcmd :
Steam>login <buildaccount> <password>
General Troubleshooting for Download Issues
- Restart computer , modem , router , etc .
- Verify firewall settings. The new system requires port 80 (HTTP) all other Steam ports, listed here.
- Temporarily disable local Anti-Virus or Spam-Blocker programs.
- Check the Steam download region under Settings->Downloads. It should match your location.
- Stop the download, uninstall, reinstall the game (clear manifest caches).
- Exit Steam is delete , delete folders appcache depotcache Steam install folder .
- Try to set your Steam download region to some other location far away. This might work if a content server near you is serving bad data.
My Mac and/or Linux Builds aren’t installing any files. Why?
If you’re testing via Steam the installation of your game or application across multiple platforms, you may run into a situation where the build deploys on Windows but doesn’t deploy any files on Mac or Linux despite your SteamPipe process being setup to upload Mac and/or Linux depots. There is a step that is easily missed which involves adding your alternate Depots to the Package being deployed. You can check what depots are included in a package via the following steps:
- Navigate to your App Admin page
- View Associated Items section , clickAll Associated Packages, DLC, Demos Tools.
- Click on the title of the Package you’re attempting to download
- ReviewDepots Included section
- UseAdd/Remove Depots ensure correct set Depots assigned Package
There are a number of discussion threads about this that may also assist:
Running steamcmd.exe results in the following error: “SteamUpdater: Error: Steam needs to be online to update. Please confirm your network connection try again.”
Resolution: Go to
Internet Options
->
Connections
->
Lan Settings
check
Automatically detect settings
.
Running the app build results in the following error: “ERROR! Failed ‘DepotBuild for scriptname.vdf’ – status = 6.”
Possible Causes:
- Account does not have permissions for the app.
- Check that the app ID is correct in the app_build.vdf.
- Check that the build account has proper permissions to the app ID.
- Steamcmd find find depot contents .
- Check that the “contentroot” value in the app_build script is a valid path relative to the location of the script file.
- Check that the “LocalPath” value in the depot_build script is a valid path relative to the path in the app_build script. Check that the path contains actual content.
Running the app build results in the following error: “ERROR! Failed to get application info for app NNNNN (check login subscription)”
This is means means Steam retrieve information app , exist user access app .
- Check NNNNN app ID assigned app .
- Check that the app ID is correct in the app_build.vdf.
- If it is a new app ID, check that the Steamworks app admin configuration has been published. New apps should have a Steam Pipe install directory as well as a depot, both can be found in Edit Steamwork Settings; the installation directory is in General Installation under the Installation tab, Depots is under the SteamPipe tab. All changes published is done through the publish tab.
- looks right , sure account owns app ID .
“An error occurred while installing [AppName] (Invalid content configuration)” at launch time
Possible Causes:
I is remember remember steamcmd command worked
Use the ‘find’ command in steamcmd to search for any steamcmd command. It will do partial matching on the command name it will list out the command syntax.
Steam>find build_installer
ConVars:
Commands:
build_installer : <project file> <target folder> <beta key> <beta pwd>